Showing posts with label Storage. Show all posts

23 August 2012

Organization Frenzy Over!

I think so, at least for now :) The last of my peeves was my Spellbinders and other dies that I have.

I went from having them all in this box, which was not only growing out of space but also annoying to page through as the plastic sleeves tend to stick together, to ... well you'll see the result on the last pic.

 I ordered more of the SU! boxes and went to work. First I placed a 4" long piece of double sided tape on  the inside of the box.

Then I placed all my dies on it - basically the same way they come.  I have investigated using magnetic sheets, but they are all too soft and when you bend them, the dies fall off, so that wouldn't work for me.
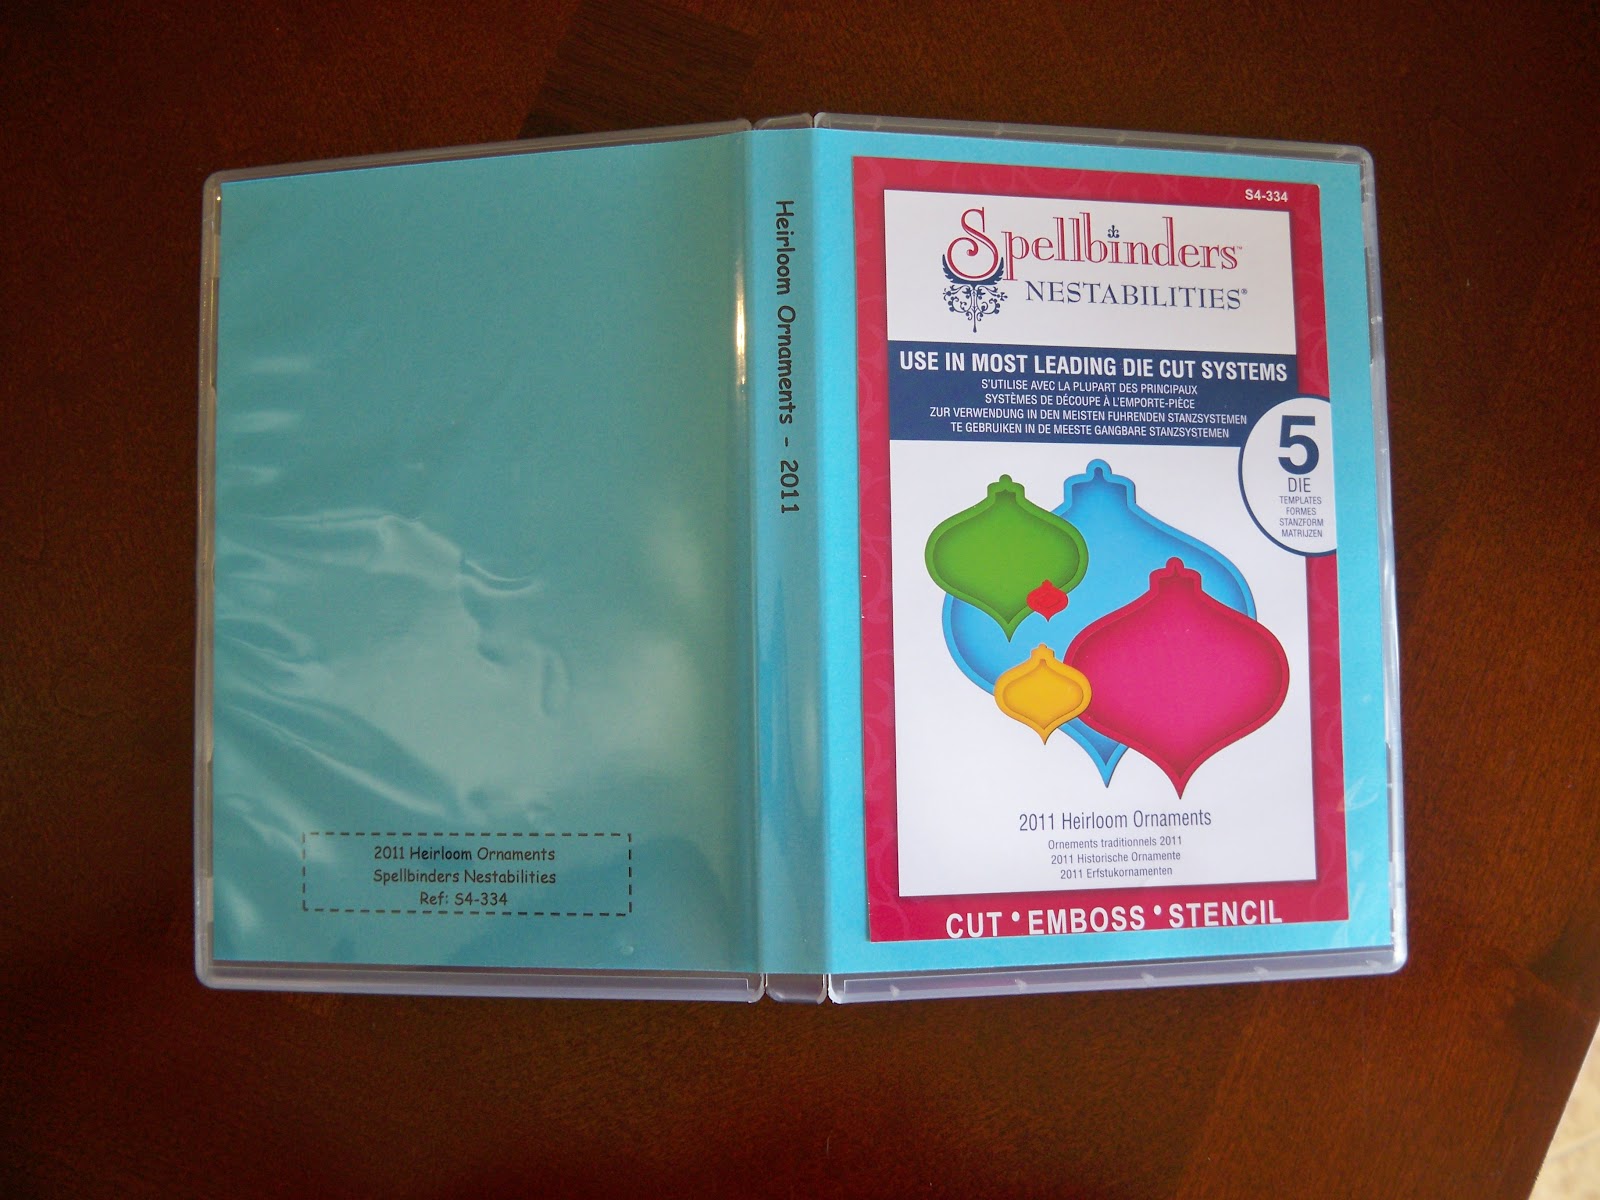
 I made a template similar to the one I made for the clear/cling stamps and used the front of the orginal packaging to put on the front of each box.

 In order to make them a little different and add some pizazz, I got some of this blue paper at Office Depot.  Since my scraproom is mostly decorated in blue and white, with a little bit of pink thrown it :), it matched perfectly.

So here is the final product. They sit on my shelf inside the same little crates I got from Walmart and they are neat and tidy and easily accessible.  I didn't alphabatize them as such, but I did put them in shape families.

So for now, I think I have found a solution to all the little peeves I had within my craft room.  I'm so happy that this is all done.  Now, not only will I have more time to play with my toys and get creative again, but I will also be able to spend more bucks on new toys instead of storage containers :)

If anyone needs any further information or a copy of the template, which is in the form of a Word Document, please don't hesitate to contact me.

Hugs,
Lena


15 August 2012

Cricut Solution Cartridges - Reorganised

When I first started getting cricut solution cartridges, these boxes seemed to be the ideal thing and I got two of them.  They really seemed great as they fit 8 cartridges and 8 overlays.  What started annoying me was the fact that I had to keep my handbooks elsewhere as they didn't fit in the box.  In my case, I kept them in this bright pink accordian little binder.  It also got old the fact that everytime I wanted a cartridge I had to run through the 8 overlays to find the one I was looking for and that is over and above the fact that everytime I opened the box, most of the overlays would fall out . Anyway, as you can see it was really starting to bug me.  I always feel that if I can't find one thing that is good about something, then it is probably time to change it :)

 I saw this binder at Jo-Anns and felt that it would be a better solution as at least I could keep everything together in one place.  Plus this binder fits perfectly on my shelf and is rather stylish, don't you think?

So, dear friends this is what it now looks like.  You'll notice that I have stored my cartridges upside down.  This is because the little nets are rather snug fitting and it's just easier to get the cartridges out by placing them in there this way.  The overlays and the handbooks now sit together in one of the side pockets. I have them corresponding to the positioning of the carts. As you can see, there are limits to this too.  I only have space for another 2 solution carts before I have to start another one, but since I haven't bought any in a while, I think that it will still last a good long time. I find that most of the carts that Cricut is coming out with I already have or have one that is very similar to it. I haven't joined the whole Craftroom craze yet. I don't like the fact that I have to rely on the internet in order to do my crafting, but I'm not totally opposed to the idea either.  I guess I've just been enjoying what I already have and my new passion of stamps and dies and this keeps me quite busy.
There are many other solutions to storing cricut cartridges and if you thinking about this, then my advice is to spend some time cruising the web to get ideas and to figure out what will work best for you.  I like having all my cartridges in their original boxes and on my shelf as you can see in the pic below

For some people, especially those who have collected all of the cartridges, it is very space consuming and so I noticed that quite a number of people are opting for putting them in some sort of box storage.  If you planning on doing that, then you won't need a seperate storage solution for your seasonal carts.
I hope that this post has helped some of you, my friends, who are thinking of reorganising your cricut cartridges

Hugs to all,
Lena


13 August 2012

Clear/Cling Stamps Organized

As you know I've been in a organizational frenzy.  There were just some areas in my craft room that were not working for me in a convenient way any more.  My clear/cling stamps was one of my major peeves. I had them all in clear CD cases, but not only was I having a problem in finding them, but they cracked and broke constantly.  Also I was finding that I had to use two boxes for every stamp set I bought because not all the stamps would fit in one case.  So, I started looking around at different storage ideas and this one came up a few times and I thought that it would work for me, so I bought a few boxes (lol 60 of them) from SU! and went to work. Take a look below:

I went from this ...

 To this!!!
(and I still have a few to do, but waiting for the rest of the boxes to arrive)

Let me give you a closer look ... I had these little crates that I had bought previously and they are perfect for these stamp boxes.  It holds 11 of them. One thing about these little crates that annoyed me was the fact that they interlock, which is normally a good idea except when you are trying to take just one out.  So hubby came to the rescue and sawed the little tabs off of the sides.

And this is what I did ... Let me use my Peachy Keen Stamps as an example:  I used the original card that came with the stamps to put on front cover.

All my cute little faces are in the same order on the inside of the box ...

I made this template, with the help of my daughter, and used it on all my boxes to keep some sort of uniformity. On the "spine" I have the name of the stamp set, on the front I have the pictures of the stamps and on the back I have a box that states the manufacturer, name of stamp set and it's reference number, just in case I ever need it.

 Unfortunately, for the most part, I no longer had the original packaging or any information about the stamp set, so in this case, for example, I just called them Halloween Cuties :), and stamped them on the front of the template and left the box at the back blank. Might not be the best, but it works for me lol.

 In some cases, where I still had the original packaging, I used that to put on the front. Not only does it look pretty but saved me a ton of stamping :)  Also see examples below ...


If anyone is interested, my template size is 10 5/8" x 7" and the it's made using Word. If you would like a copy, just e-mail me at lenfon@msn.com and I will send you the attachment.
Next, I'm going to deal with my stamp pads. Thanks for stopping by today and sharing my organizational adventures. I'm busy finishing off a card for a dear friend, so I will post that later.

Hugs,
Lena


06 August 2012

Organization Frenzy - Sponge Daubers

I have finally decided to tackle those things that annoy me in my craft room.  One of them was my sponge daubers.  I used to use one per colour family but then my greens, blues and pinks were getting all inked up in the wrong shades, so here is my latest organization project.  I bought this box a while back for little  embellishments but it didn't work for me, so I redid those and found that this box was perfect for my little daubers.  Most of these colours are from the Memento range of stamp pads.  If you click on the pic you will see that some have little stars above the name - those indicate Tim Holtz stamp pads.  I do have a few more that didn't fit in this box, but as my collection of stamp pads grow, I think that I will eventually have a box for Memento inks and another for the Tim Holtz inks. My very smart daughter made a chart with the names of the inks for me. I then stamped a heart of each colour that correspondes with the colour of the sponge dauber.  I adhered each little card to the lid with a removable zot - this way I can change it when the need arises. So, what do you all think?  Any better suggestions are expremely welcome :)
Now it's off to the next project ... I want to do my cling/clear stamps, my spellbinders and my patterned paper scraps drawer.  In between I need to make a few cards, so I will share those with you in the next few days too.
Wishing you all a wonderful week,
Hugs,
Lena


07 September 2011

Craft Room Revamped!

Yes, it's done! I'm so happy with the way it came out. As you probably noticed by now, I like to have a place for everything and everything in its place :) As you can see this all came out perfectly and with the added bonus that I have practically everything I need within arm's reach! I don't know if that makes me organised or just lazy, my crafty friends, but I'll let you decide. I'm just too excited and happy that it worked out that way! This is one view of my desk with my embellishment centre, my cricut and all my odds and ends in the different boxes. I love my see-thru boxes - I keep things like stickles, glues, glitters, alcohol inks, cuttlebug folders, clear stamps, die cuts, etc. in them. On the top shelf I have a few of the items I make on display. I don't only do papercrafts, I also make diaper cakes, wedding towel cakes, gift baskets, party favours, and the list goes on. I keep all my records filed neatly in the different binders.This is a view of the other side of my desk and the major new addition to my room. These cubicle units that I got at IKEA are just great not only for the added storage, but my hubby made a top that goes over them both, and that gives me extra counter work surface. This is where I do all my cutting, cuttlebugging (word?), etc. At the end against the wall, I have drawer units which I use to keep all my paper stacks. I can put 4 to 5 stacks in each drawer. They are all labelled by season, colour, etc. On this pic. you can see that I was very generous and gave hubby a little corner of my room for him to pursue his hobby which is painting. Since the window is on that side of the room, it was perfect for him.
I had already posted this on an earlier post, but here it is again as the view from opposite side of my desk. The large cupboard is where I keep all my things for the non papercrafting goodies. And yes, everything in it is also all stored in boxes. I just love pulling out what I need, work with it and put it back. Easy peasy!

06 September 2011

Storage Share - Clear/Cling Stamps

I hope that by now, you are not totally bored with all the storage shares. Since I've been revamping my crafty corner, I haven't had space to create anything and since some of you have asked about my storage, I thought now would be the perfect time to share it with you.
So for today, I'm sharing with you how I store my clear stamps. Very easy - I place them in CD covers, and then into a box they go. I keep them in categories, such as holidays, fonts, swirls, florals, etc. These boxes fit perfectly side by side on one of my shelves.
The revamping is almost done and I'm so excited - it's going exactly has I'd envisioned it. I have this great hubby that is able to convert my dreams into reality!

05 September 2011

Storage Share - Wood Mounted Stamps

A while back I decided that I would convert all my wood mounted stamps into cling stamps. I did this to quite a number of them and then I decided that I didn't like it. I buy mostly clear stamps, but occasionally I do get the odd wood one. I bought these boxes at Walmart - they are great in that are flat-ish, see through, have a lid, and are stackable. This way, I can keep them stored by season, it's easy to see what is in what box, are dust free and they fit perfectly in one of my cublicles.
My problem with converting my stamps is that I can't seem to line them up properly to stamp the image on the reverse side, so when I take them off the wood, it's always a hit or miss for me to stamp exactly in the place where I want the image to go. Not very bright, I know, but hey we all have our thing ;-)

03 September 2011

Storage Share - Scraps

So this is how I store my solid colour scraps, in hanging folders in a box bought at Walmart. This works great for me. In the tag section of each folder, I put a piece of cardstock indicating the colour range in that specific folder so when I pull it out, I can see all the different shades I have. I normally only keep scraps that are bigger than 4" x 6". Anything smaller than that, although it kills me, I throw out. This decision came about a while back when I had a bunch of smaller pieces that were just cluttering up my space in the box and in the end I wasn't really using them.
My printed scraps are another story. At the moment they are all thrown into this drawer, but this is not working for me at all. In fact, it is the most painful thing I have in my craft room right now. The problem is that I'm not too sure how I want to organise this. Do I want to organise them by colour or by theme? In both cases there are some that overlap and there in lies my problem. So, if any of you crafty ladies/gents has found a solution for storing your printed scraps, won't you please be so kind as to share it with me? I really would appreciate your help with this.

02 September 2011

Storage Share - Embossing Folders

Here is a quick look at how I store my embossing folders. I got this idea and .cut file from Okieladybug. I bought my box at Walmart and as you can see the folders fit perfectly. I emboss one side of the folder so that I can immediately see the effect when I'm looking for a specific pattern. It's easy, contained and clutter free, just the way I like it :-)

01 September 2011

Storage Share - Ribbon & Cricut Cartridges

Some of you wonderful followers have emailed me asking me about my storage. Well, I don't have as much as some of the very talented crafters out there, so my system works for me. In fact, I'm in the process right now of revamping my crafting corner, which by the way, has pretty much taken over the entire room :-). You start small, but it eventually grows!
So for my first share, here is how I store my ribbon and my cricut cartridges. I bought a narrow CD tower at IKEA. I tilted the shelves and that is how I keep my ribbons in place. You can see in the second pic that the back pegs that hold the shelves in place are one slot down from the front ones. With the tilting, the spools stay in place at the back of the unit. I got so tired of dealing with the storage unit I had with the dowels. As you can see I like to store mine by colour and it was always such a pain to insert a new ribbon spool into the colour family when they were in the dowels. Also, inveriably it was always the one in the middle that would be finished and need to be replaced. This way, I just add in and take out what I want without any problems.
As for my cartridges, I bought the double wide CD tower also from IKEA. I've been looking at the various boxes and binders that you can buy in order to minimize the storage space for the cartridges, but to be honest, I like mine in their original boxes and right where I can see them all at a glance. This helps remind me of what cartridges I do have. You might think that if I need a reminder then I probably have too many, and you may be right, but I love all of my cartridges and do use them all :-) I keep all my Disney cartridges together on the top shelf. My solution cartridges are in the double cartridge boxes and I keep those together on the bottom shelf. Also on the bottom shelf are all my cake cartridges. All the others are kept inbetween in alphabetical order. It just helps me find it fast when I'm looking for a specific one. I think they fit perfectly on this unit and I still have space to add any future ones that I may want to purchase ;-)
Since these units are the same length and depth, they look great side by side right next to my big closet, but that is a storage share for another day. If you have any questions, please email me and I will try to help.