Showing posts with label Tutti Designs. Show all posts

31 August 2024

Christmas Crafts All Year 'Round ~ Trees and/or Barns

   Hello and welcome to this month's Christmas challenge at
 Christmas Crafts All Year 'Round. 
 

Our challenge this month is Trees and/or Barns

Here is our inspiration pic ...


I recently received a card kit from my SIL and thought it perfect for this challenge since there are several trees on it.


I used my own papers for the card design. It's a great way to use up some of those never ending scraps.
I cut each circle using a die from the X-Stitch Nesting Circles die set from Tutti Designs. Then I cut them right down the middle and that is how I got the two perfect halves for this card design.


The image is cut from a decoupage sheet and is made up of four layers.  I used foam squares to adhere the layers to each other.


Continuing with the "trees" theme to the back, I added another couple of trees that were included in the kit.


This is a 15cm square card and fits perfectly into a 5.75" square envelope.
Forgot to mention that the little banner that says "Merry Christmas", in Dutch, was also included in the kit.  Since this card will be going to someone dear to us in Holland, the sentiment is perfect!

Thanks so much for stopping by today. Now it's your turn to make a Christmas project, that falls within our challenge theme, and come play along with us.  You have till the end of the month to link your project to our blog at  Christmas Crafts All Year 'Round.

Crafty hugs,


01 September 2022

Dies R Us #200 ~ If the Hat Fits ...

Hello everyone and welcome to the last challenge at Dies R Us.  Yes, sadly you read that right, this is our 200th post and it will also be the last one as the Dies R Us challenges will be closing down.


Challenge #200 ~ Anything Goes
(as long as you use a die that is sold at Dies R Us)

For my last DT card, and with Halloween just around the corner, I made this cute and fun Halloween card.


Tutti Designs is one of my go-to brands when I'm in a time crunch.  They are so easy to use - normally just a little bit of paper piecing and voila you have a card 😀 This time I used the Witch Hat. I cut it out of black 3 times, twice out of green and once out of the orange and the purple. I used a piece of double sided tape on the back of each hat, so that it was easy to puzzle my paper piecing.  Once this was done, it was time to work on the background.  With the size and number of hats I wanted to use, a slimline card was just the ticket. I cut out the spider web background out of light grey cardstock so that it would stand out from the white but would not blend in with the black of the hats.


While paper piecing my hats, I did this one too.  It was pretty easy really, just swap the green and black cutouts and two hats were done simultaneously, the black and green for the front of the card, and the green and black for the inside of the card :-)  And that was it.  Second Halloween card done for 2022, a few more to go 👻

Now for the list of supplies used to make this card, each linked to the
Dies R Us store for your convenience.

 Tutti Designs - Slimline Cross Stitch Rectangles

Thanks so much for stopping by and spending a little of your day with me.  I hope I was able to inspire you to create a project, and  play along with us at the Dies R Us Challenges for your chance to win a gift certificate to the Dies R Us Store.  This final challenge will run until the 13th of September, 2022.

  I must admit that although I'm sad posting this last post for Dies R Us, I'm very blessed to have been on this wonderful adventure for several years.  My very first post was in April 2017 on the Inspiration team!  I want to thank Dani, the owner of DRU,  for having me as part of the Dies R Us family for so long.   I would also like to thank Anne, my team leader, Darlene, my previous team leader, and all my teamies for the wonderful support, encouraging comments, and let's not forget all of the enabling 😀 I wish each one of you wonderful crafting opportunities in the future!

I'm playing along at


Till next time,
crafty hugs!

15 August 2022

Dies R Us #199 ~ Bee-utiful Summer!

  Hello and welcome to another challenge, starting today, at Dies R Us.


Challenge #199 ~ Summer
(as long as you use a die that is sold at Dies R Us)

My little granddaughter just started 3rd grade.  How time flies! It doesn't seem that long ago that I was picking her up from pre-K3 :-)  Anyway, before I get all mushy, here is the card I made for her!


I love, love these cute little bees from Marianne Designs and thought they would make a sweet card for my sweet Emma :-)  I purchased the Marianne Design dies during one of the International Dies sales events that Dies R Us holds every so often.  The best way to know about these sales is to subscribe to their newsletter HERE.

There is not really much to tell about this card. It was just a matter of cutting out all the bits and pieces and then adhering them together to create the scene.  I also love the slimline cross stitch rectangles.  It makes such an interesting background.  It's easy to build your scene from there. The only other thing I would like to mention is that the honeycomb die acts as a stencil as well, so it's easy to get the definition of the honeycomb by sponging in distress oxide ink.

Here is the list of supplies used to make this card,
each linked to the Dies R Us store.


I purchased the Marianne Design dies during one of the International Dies sales events that Dies R Us hold every so often.  The best way to know about these sales is to subscribe to their newsletter HERE. 

Thanks so much for stopping by and spending a little of your day with me.  I hope I was able to inspire you to create a project, and  play along with us at the Dies R Us Challenges for your chance to win a gift certificate to the Dies R Us Store.  A new challenge begins on the 1st and 15th of each month.  Since there is a prize to be won on every challenge, you could be the lucky winner! If you have a minute, please visit our challenge blog, where my team mates showcase their creations to provide you with some wonderful inspiration.  Be sure to follow us on Facebook and Pinterest too.  


And don't forget to visit our sister store, Didi Crafts.  It has warehouses in the US and Canada. This means that our Canadian friends no longer have to worry about huge taxes or expensive shipping fees.  It has some products that are the same as Dies R Us, but in addition, it carries international dies,  and other crafty supplies for a variety of crafts.  Go take a peek and be pleasantly surprised!

Crafty hugs,


03 August 2022

Snowflake Trio Slimline Card

Hello and welcome everyone.   I've had these gorgeous Ornamental Snowflakes, from Tutti Designs, for a while, but hadn't had the chance to play with them yet.  Since I'm a little short on Christmas cards, I thought now would be the perfect time :-)


Aren't they pretty?  And just with a little paper piecing, it makes them even a little extra special.  In addition to the paper piecing, I added a few tiny gems to add a little sparkle.

On the inside, I added the strip of paper that was left from the mat in the front and another few snowflakes.  These tiny snowflakes were cut using a MS punch.  The background was cut using the slimline background die from the Slimline Pull Tab die set by Heffy Doodle.  This slimline card was really quick and easy to make and would be wonderful for mass producing.

Thanks so much for stopping by and spending a little of your day with me. 

Crafty hugs,


15 July 2022

Dies R Us #197 ~ Madonna

 
Hello and welcome to another challenge, starting today, at Dies R Us.
Christmas in July is when my Christmas fun begins.  It's all about Christmas from now on, taking a little bread for Halloween and Thanksgiving.  I've already spent a few hours going thru the stores admiring all the new Christmas decor that has come out for this year, while humming Christmas songs in my head. 😀


Challenge #197 ~ Anything Goes
(as long as you use a die that is sold at Dies R Us)


If you enjoy paper piecing then this Madonna die is the die for you. I cut it out of white, blue, beige, and gold cardstocks. Using the white as my base, I paper pieced the other colours. I think it's beautiful.  I didn't want the focus to be taken away from this die, so I went looking thru all my background dies and frames and thought that this Ice Flower Frame would be perfect.  Just paper pieced a few gold stars as accents and my card was done.  If you're running short on time and need to mass produce, this is easy, simple and beautiful, in my opinion anyway 😀

Here are the couple of dies I used.  I linked them to the Dies R Us store for your convenience.


Well, that is it for today. Thanks so much for stopping by and spending a little of your day with me.  I hope I was able to inspire you to create a project, and  play along with us at the Dies R Us Challenges for your chance to win a gift certificate to the Dies R Us Store.  A new challenge begins on the 1st and 15th of each month.  There is a prize to be won with every challenge, you could be the lucky winner! If you have a minute, please visit our challenge blog, where my team mates showcase their creations to provide you with some wonderful inspiration.  Be sure to follow us on Facebook and Pinterest too.  


And don't forget to visit our sister store, Didi Crafts.  It has warehouses in the US and Canada. This means that our Canadian friends no longer have to worry about huge taxes or expensive shipping fees.  It has some products that are the same as Dies R Us, but in addition, it carries international dies,  and other crafty supplies for a variety of crafts.  Go take a peek and be pleasantly surprised!

Crafty hugs,

01 October 2021

Dies R Us #178 ~ Witch Scene

  Hello everyone, and welcome to our latest challenge at Dies R Us.


Challenge #178 ~ Anything Goes! 
(As long as you use a die sold at the Dies R Us store) 

Since it's the 1st of October, I thought I would kick off the month with a Halloween card.


I began by cutting the Witch Scene die in black, orange and mossy green card stocks.
I cleared all the bits and pieces from the black die cut and placed it on a piece of wide double side tape.  Next I paper pieced all the different colours onto my black outline die cut to achieve a colourful Halloween witch scene.  And what is Halloween without a ghost or two, right? So I added a couple of ghosts for a little more spooky look 👻  I also added a triple loop bow made out of orange organza ribbon to finish it off.


On the inside, I cut out a little pumpkin, adhered all the pieces together and added the remaining little ghost for good measure. 


Here is a close up of the paper piecing I did in order to get all the different colours to create the scene. I forgot to mention that for the ghosts, I die cut them out of grey vellum and white card stock.  I put each vellum ghost thru my Xyron sticker maker.  This way, when I adhered them to the white card stock, the glue does not show thru because each ghost is uniformly coated with the adhesive material.

Now for the list of supplies, each linked to the Dies R Us store, for your convenience.

Karen Burniston - Hanging Halloween Charms
(Currently out of stock but THIS one would also work)

Thanks so much for stopping by today. I hope I was able to inspire you to create a project, and  play along with us at the Dies R Us Challenges for your chance to win a gift certificate to the Dies R Us Store.  A new challenge begins on the 1st and 15th of each month. Visit our challenge blog, where my team mates showcase their creations to give provide more inspiration.  Be sure to follow us on Facebook and Pinterest too.  

And don't forget to visit our sister store, Didi Crafts.  It has warehouses in the US and Canada. This means that our Canadian friends no longer have to worry about huge taxes or expensive shipping fees.  It has some products that are the same as Dies R Us, but in addition, it carries international dies,  and other crafty supplies for a variety of crafts.  Go take a peek and be pleasantly surprised!

Till next time,
be Fa-BOO-lous!


10 September 2021

Wishing you fairies ...

   Hello crafting friends!  Welcome to my Fairy Stamper Friday share.


When I first saw these fairies, I thought that they looked very dainty sitting on their magical flowers.  Then while looking through my papers, I found this paper pad from The Paper Boutique called Lavender Fields, and with its dainty floral pattern, I thought it would be a perfect match 😀

I used slimline dies, from Marianne Designs and Tutti Designs, to cut and create the card base and the different mats for the fairies. You can find a selection of slimline dies at the Fairy Stamper store HERE.

On the inside, I continued with my fairy magic and the lavender and green colour scheme.  I haven't added a sentiment to the inside because I'll probably just write my own personal message. I love the greeting on the front of the card.  I think it's a wonderful wish for several different occasions, but especially for birthdays!

As you can see it was pretty simple to put together. As I mentioned before, although I love silhouette stamps, I don't always have the time to create a pretty background with all the lovely inks, sprays, etc. that are available.  At times like these, my dies tend to come to the rescue. 😀

I have listed the materials I used to create this card, and I have linked each to the Fairy Stamper store.
Fairy Hugs Glitter - Translucent Pearl
Fairy Hugs Ink - Raven Black

Thank you so much for stopping by today.  I hope I have inspired you to create a project so that you can  come join in the fun. Our challenges go live every other Thursday on our Facebook group.   All you have to do is to create a project and upload the pic to our challenge album.  There is a $15.00 prize for one lucky participant.

Till next time,
crafty hugs!

01 September 2021

Dies R Us #176 ~ A New Home

    Hello everyone, and welcome to our latest challenge at Dies R Us.

Challenge #176 ~ Anything Goes! 
(As long as you use a die sold at the Dies R Us store)

I made this card for a dear friend who just moved to a new home.


I used a die set that I had gotten a while back, but hadn't used yet.
You know those, right? Those dies you absolutely love and have to have and then you kinda forget you have them?  No? Well, maybe I'm the only one and shamefully I will tell you that it happens more often than I care to admit :-)

But back to my card ... I cut out all the elements first.  The large ones I tend to cut out of the proper colour cardstock, but for all the itty bitty pieces, I tend to cut them all out of white and then use copic markers to colour them in.  Once all this was done, I began working on my card.  I started by cutting out a circle on the front of the card.  Next I cut out a frame for it to draw your eye to the scene behind it.  Once this was done, I placed all my elements on the inside of the card making up the scene as I went along and checking often how it would look when looking thru the circle in the front.  Once it was all in place, I used a piece of Press 'n Seal and pressed it over the scene.  I find this very useful as it holds everything in the right place.  Then it's just a matter of applying glue on the back and pressing it down.  I tend to use a little bit of extra glue just so it stays fluid enough to be able to move things around, like to place a bird in the right place or to straighten something that got a little out of place when gluing the whole scene down, etc. If  you only use a tiny dot, which is normally adequate enough, it dries up very quickly and does not give you a chance to move things if you need to.

Since there isn't much space to write your message on the inside of the card, I made a panel to adhere to the back of the card.  Can you see that I had a couple of daisies left over? :-)  And that was it.  I like the way this card came out.  Bright summer colours for a bright summer move to Texas :-)

Here is the list of supplies I used to make this card. Remember that certain international dies, like some of the ones I used, are only available at the store during the Special Sales events that Dies R Us has every so often.  The best way to know about these sales is to subscribe to their newsletter. You will find the subscribe box on their home page HERE.

Precious Marieke - Grass Border
Currently out of stock but any of THESE will work.
Marianne Design - Daisy Punch Die (Special Order Sales)

Thanks so much for stopping by today. I hope I was able to inspire you to create a project, and  play along with us at the Dies R Us Challenges for your chance to win a gift certificate to the Dies R Us Store.  A new challenge begins on the 1st and 15th of each month. Visit our challenge blog, where my team mates showcase their creations to give you a little more inspiration.  Be sure to follow us on Facebook and Pinterest too.  

And don't forget to visit our sister store, Didi Crafts.  It has warehouses in the US and Canada. This means that our Canadian friends no longer have to worry about huge taxes or expensive shipping fees.  It has some products that are the same as Dies R Us, but in addition, it carries international dies,  and other crafty supplies for a variety of crafts.  Go take a peek and be pleasantly surprised!

Till next time,
crafty hugs!


15 July 2021

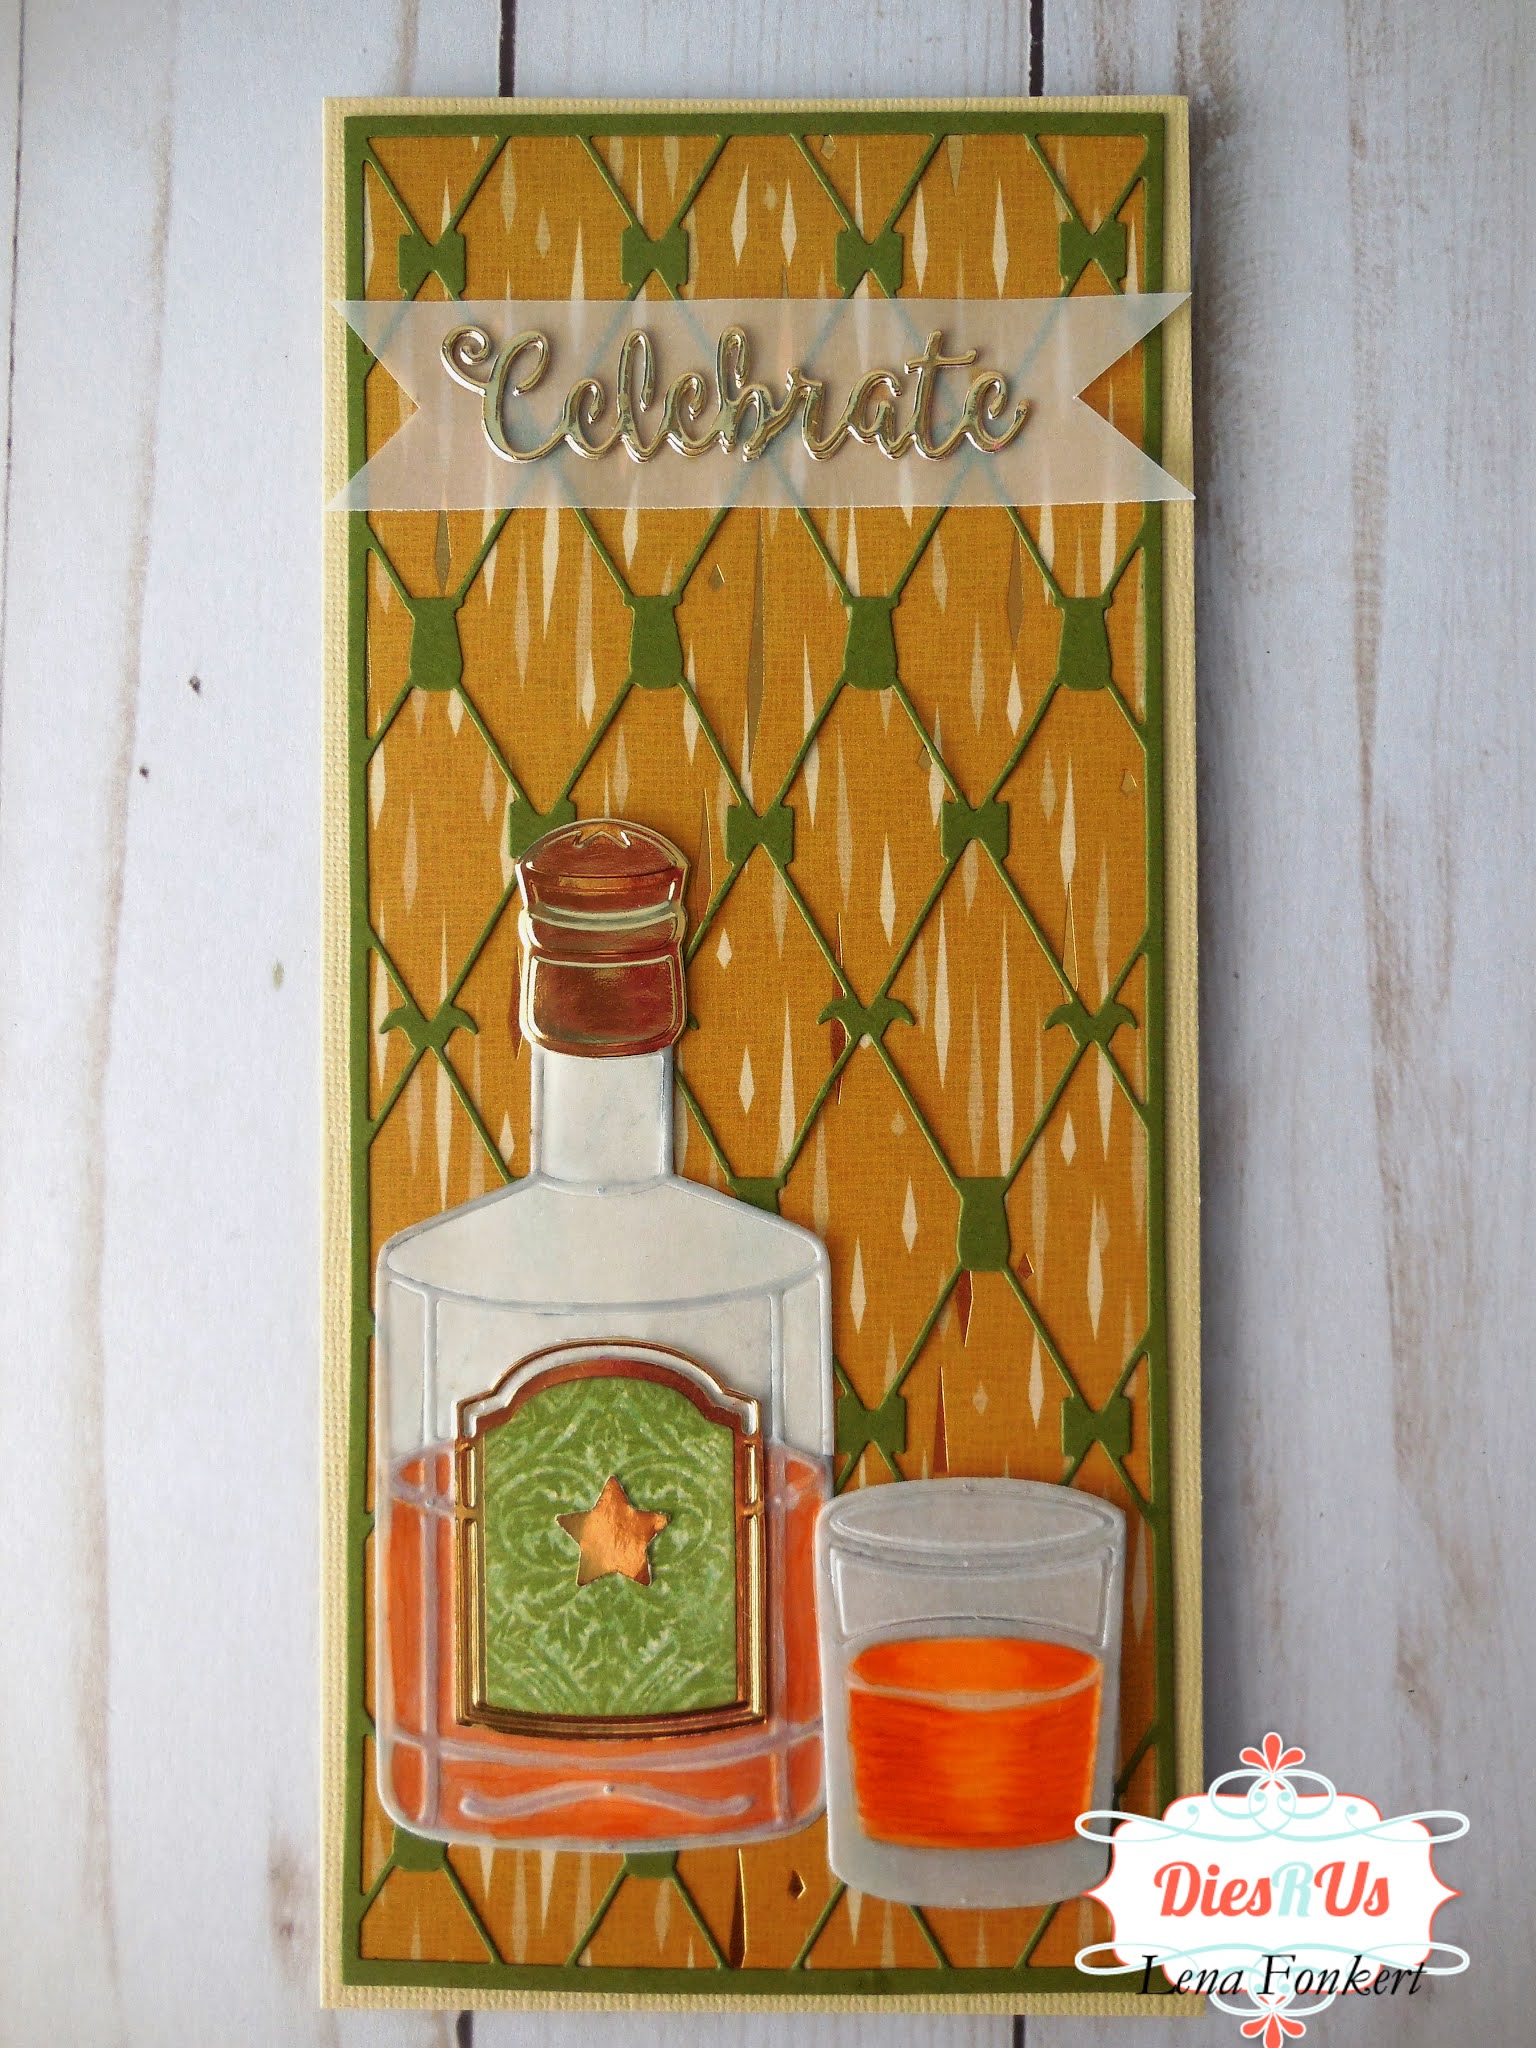
Dies R Us #173 ~ Whiskey Card

     Hello everyone, and welcome to our latest challenge at Dies R Us.

Challenge #173 ~ Anything Goes! 
(As long as you use a die sold at the Dies R Us store)

My son asked me to make a card for dad's birthday, so I came up with this card.


I die cut the whiskey bottle and glasses (there is another one on the inside)  out of vellum paper. Next I die cut another few pieces so that I could add whiskey colouring. The whiskey is showing up a lot redder than it actually is in real life, but that's what happens when you need photography lessons :-) Anyway, once all the pieces were cut and coloured, I adhered them together using a Zyron sticker maker. This way, the entire reverse side of the vellum is covered in glue preventing the ugly glue marks you sometimes see thru the vellum.


I love this paper I found in my scraps drawer, as it has gold accents which perfectly go with the gold on the bottle and the sentiment.  I die cut the word three times and adhered all the layers together to give it dimension and add stability.  I wasn't happy that it didn't pop enough, so I added a vellum banner behind it.


For the inside, I die cut the same background and added a whiskey glass.  For the greeting, I cut out two ovals, one in gold mirror cardstock and one in white and adhered them together.

That was it. My son liked and so did dad so mission accomplished :-)

Here is the list of crafty supplies I used, each linked to the Dies R Us store for your convenience.


Thank you so much for stopping by today. I hope I was able to inspire you to create a project, and  play along with us at the Dies R Us Challenges for your chance to win a gift certificate to the Dies R Us Store.  A new challenge begins on the 1st and 15th of each month. Visit our challenge blog, where my team mates showcase their creations to give you a little more inspiration.  Be sure to follow us on Facebook and Pinterest too.

Before I go, let me mention that Didi Crafts is our sister with warehouses in the US and Canada. This means that our Canadian friends no longer have to worry about huge taxes or expensive shipping fees.  It has some products that are the same as Dies R Us, but in addition, it carries international dies,  and other crafty supplies for a variety of crafts.  Go take a peek and be pleasantly surprised!

Till next time,
crafty hugs!


01 June 2021

Dies R Us #170 ~ Congrats Grad

   Hello everyone, and welcome to our latest challenge at Dies R Us.
Challenge #170 ~ Anything Goes! 
(As long as you use a die sold at the Dies R Us store)

And just like that we are halfway through 2021 and many young men and woman are beginning a new chapter in their lives.  I made this card for a very sweet young lady who will be off to college in the Fall.
The school colours are maroon, black and white but I wanted something a little more feminine, so I settled for just using a little of the maroon (although in the pics, it shows more red and maroon).


I began with a piece of pattern paper from the English Garden Paper Pad from StudioLight. Next I die cut all my elements and assembled them on the card. I cut the stack of books in the various colours and then paper pieced so that I would have the different coloured books.

 On the inside, I used another pattern paper from the same paper pad and cut out the sentiment.  Again, I paper pieced a few accents in maroon to bring in some of the school colours. 

Now for the list of supplies I used, all linked to the Dies R Us store, for your convenience.

Marianne Designs - Vines (Special Order Event)
Studio Light English Garden Paper Pad

Did y'all catch the latest European dies sales, Dies R Us had recently? I did and as always, I got a few new goodies to play with. It was through one of these sales that I got the Marianne Designs dies that I used on this card.  The best way to know about these International dies sales is to subscribe to the newsletter. You will find the subscription box on the home page at Dies R Us.

Thank you so much for stopping by today. I hope I was able to inspire you to create a project, and  play along with us at the Dies R Us Challenges for your chance to win a gift certificate to the Dies R Us Store.  A new challenge begins on the 1st and 15th of each month. Visit our challenge blog, where my team mates showcase their creations to give you a little more inspiration.  Be sure to follow us on Facebook and Pinterest too.

Till next time,
stay safe and healthy!