Showing posts with label Moonstone Dies. Show all posts

31 July 2023

CCAYR ~ Eight Maids a Milking

  Hello crafting friends and welcome to this month's challenge  at Christmas Crafts All Year 'Round.  On our "The 12 days of Christmas" challenges, this month we have Eight Maids a Milking. 


This is August's inspiration pic.
Our challenge this month is to have Eight of something or For a Child.

I created this shaker tag for my lil grandson.


Crafty supplies used to make this tag:

Elizabeth Craft Designs - Snow Globe
Elizabeth Craft Designs - Holiday Elf - His
Marianne Design - Pine trees
Lawn Fawn - Stitched Hillside Borders
Moonstone Dies - Snow Globe

Thanks so much for stopping by today. Now it's your turn to make a Christmas project that falls within our challenge theme, and come play along with us.  You have till the end of the month to link your project to our blog at  Christmas Crafts All Year 'Round.

Crafty hugs,

16 April 2023

Hippity Hop!

Hello crafting friends.  I have another Easter card to share with you. Since this card was mailed overseas, I did not add a lot of  layers to it,   Isn't his bunny cute? :-)


Crafty Ingredients:

Hunkydory Moonstone Dies - Arched Window Nesting Dies
Cottage Cutz - Carrot Patch Bunny
Cottage Cutz - Happy Easter word dies
Cottage Cutz - Savanna (for clouds)
MS Punch - Butterflies

Thanks for  stopping by today.  Until next time, stay safe and well.

Crafty hugs,


11 May 2022

Crafty Gals Corner #231 ~ Buttons &/or Bows

   Hello crafting friends and welcome back to another fun challenge
 starting today at Crafty Gals Corner


Challenge #231 ~ Buttons &/or Bows

Our sponsor for this challenge is: 
      

Prize ~ $10 Gift Certificate

Using Fairy Columbina, I made this card.


I used Columbia's colours, blue, red and yellow as the colour combo for my fairy and my card.

Materials used to make this card:
MoonFlower Digis - Fairy Columbina
MoonStone Dies - Arched Window Nesting Dies
Kat Scrapiness - Happy Birthday w/Shadow
EK Tools - Photo Corners Punch
Marianne Designs - Pearls
Copic markers used for colouring

  That's all for today friends.  Thank you so much for stopping by. I hope you liked my card, and feel inspired to get crafty and come play along with us. You have until 12:00 pm, CST, on 7 June 2022, to link your project to our challenge.

Crafty hugs,


15 March 2022

Dies R Us #189 ~ Stitched Ice Crystals Border

 Hello everyone and welcome.  A new challenge begins today at Dies R Us.


Challenge #189 ~ Anything Goes 
Our only requirement for you to play along with us, is that you use a die on your project that is sold at the Dies R Us store.  And, of course, that your project applies to our monthly theme 😀

Since this month the theme is Anything Goes, I had to try out my new dies I recently purchased during one of the International Dies sales events.  I'm sure you know by now, but in case you are new to my blog, the best way to know about these special order events is to subscribe to the Dies R Us newsletter HERE.


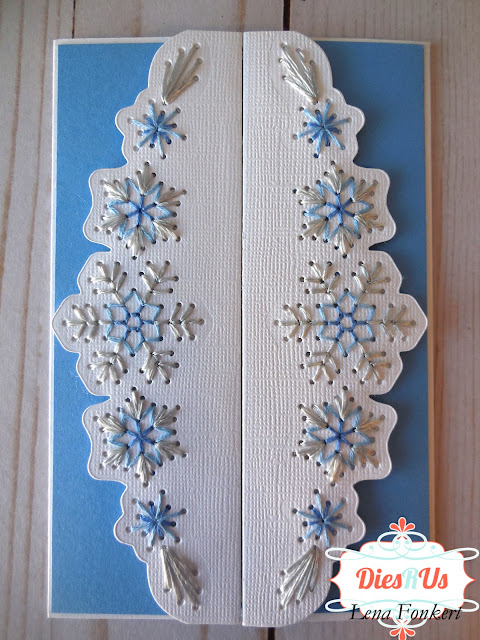
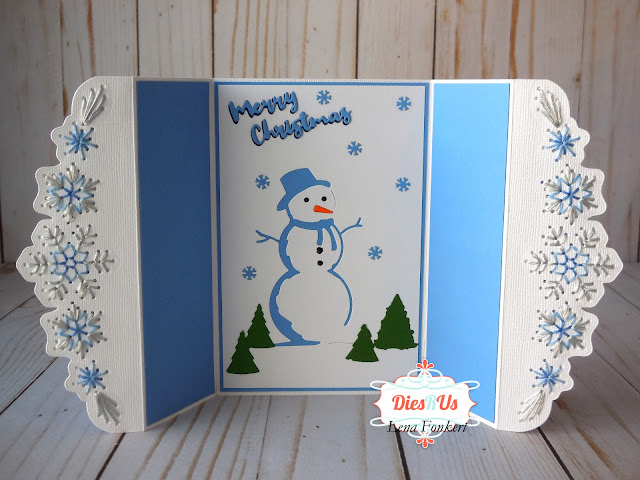
I started with a piece of 12" x 6" cardstock and scored it at 2", 4", 8" and 10".  This gives you a 4" x 6" card when closed.  Next I die cut the Ice Crystals border on both end flaps of the card and got busy stitching the snowflakes. So much fun and you can make them in so many different patterns and colours, the possibilities are endless! I'm really loving these stitched border dies.  Can't wait to get my hands on the newest ones 😀  I used 3 strands of the DMC embroidery floss to stitch the snowflakes.  I'm a little disappointed that you can't see the silvery shine of the white satin floss on the pic.  It really does look so much prettier in person.

On the inside I made a winter scene without adding too many layers, as this would interfere with the closing of card.  If you do add a few layers and see that your card no longer stays closed nicely, you can always make a belly band.  I just didn't want to take away from the beauty of the stitched border.


I made a double mat at the back  so that I will have plenty of space to write my personal message.  As you can see it fits perfectly in a regular A7 envelope.

Here are the supplies I used to make this card. I have linked what I could to the Dies R Us store, but remember that some of the dies I used are only sold during the International Dies sales events which happen every so often.

(Currently out of stock, but any small tree and tiny snowflake dies would work)

Thanks so much for stopping by and spending a little of your day with me.  I hope I was able to inspire you to create a project, and  play along with us at the Dies R Us Challenges for your chance to win a gift certificate to the Dies R Us Store.  A new challenge begins on the 1st and 15th of each month.  There is a prize to be won with every challenge.  Visit our challenge blog, where my team mates showcase their creations to provide you with more inspiration.  Be sure to follow us on Facebook and Pinterest too.  


And don't forget to visit our sister store, Didi Crafts.  It has warehouses in the US and Canada. This means that our Canadian friends no longer have to worry about huge taxes or expensive shipping fees.  It has some products that are the same as Dies R Us, but in addition, it carries international dies,  and other crafty supplies for a variety of crafts.  Go take a peek and be pleasantly surprised!

Crafty hugs,

May you always have love to share,
health to spare, and friends that care! 


31 December 2021

CCAYR ~ Christmas Cake Challenge ~ January

  Happy New Year crafting friends, and welcome to our January challenge at Christmas Crafts All Year "Round.

We have a year filled with fun and yummy challenges for you.  Deanne has come up with "Christmas Cakes" inspired challenges for us. 

 Each month, there will be a pic of a Christmas cake and a brief description of what the challenge will be.  A little confused? No worries! Let's start with January's challenge and you'll see how it works and will be joining in the fun ... as well as wishing for a nice slice of Christmas cake to go with that delicious cup 'o java 😀


January Christmas Cake Challenge ~ Snow People

So this is the inspiration picture for this month, and the description is "Snow People".  Now all you have to do to participate in our challenge is to make a card with Snow People.  See, it's easy peasy!

Here is my Snow People card for this challenge.


I used a piece of left over cardstock from the North Wind paper pack. I love this image so decided to turn it into a card. I used dies from the Arch Snowmen Festive Portals Collection by Christina Griffiths, as well as Arched Window Nesting Dies Moonstone dies by Hunkydory to make this card.  Although the trellised background is gorgeous on its own, I added a couple of poinsettias to the corners.  I used a combination of dies from Marianne Designs and Poppy Stamps to make the poinsettias just the right size I wanted for the card.  To finished it off, I scattered a few crystal gems on the front of the card.

Thanks so much for stopping by today. Now it's your turn to make a Christmas project and come play along with us.  You have till the end of the month to link your project to our blog at Christmas Crafts All Year 'Round.

Crafty hugs,


15 October 2021

Fairy Stamper ~ Festive Aperture

Happy Friday friends and welcome to my Fairy Stamper Friday share!


As you know by now, by favourite cards to make are Christmas cards.
I also love using fairy stamps and I love to use dies, so to be able to use both to create my favourite type of card  is just awesome :-)


This card was very easy to put together and uses just a few supplies.
I began by cutting out the poinsettia aperture and doing a little bit of paper piecing in order to get my red poinsettias with the green holly leaves. Next I used a pre-made background and stamped the sled and the skunk.  I then stamped the fairy on a scrap piece of X-Press It carstock, coloured it in, and fussy cut it so that I could adhere it in such a way that it looks like she is sitting on one of the flowers have a discussion with the little skunk.  I bet they are trying to figure out whether the little guy is on the Nice or Naughty list, because Santa will soon be here.  Jada is trying really hard to explain to him that spraying fairies with his odious smell, will definitely put him on the naughty list, especially when he does it just for fun!!! The little rascal!!! ðŸ˜€  On the inside, I stamped my Christmas wish and a couple of holly leaves.

Here is the list of supplies I used, most linked to the Fairy Stamper store, for your convenience.

Fairy Hugs Stamps - Jada, Wooden Sled, Skunk Set
Nellie's Choice Stamps - Poinsettia (for the holly leaves on the inside)
Frog's Whiskers Ink Stamps - A Wonderful Year
Fairy Hugs Papers - Galaxy (for the background)
Fairy Hugs Glitter - Translucent Pearl
Moonstone Dies - Festive Floral Aperture
StazOn Inks - Blazing Red
VersaFine Clair Inks - Pinecone, Forest Green, Nocturne
Memento Inks - Tuxedo Black (this ink does not run when using copic markers)

There may be a few things that you can't find in the store right now.  These are probably goodies I purchased during one of Fairy Stamper's Special Order sales events.  The best way to know about these sales is to subscribe to their newsletter HERE.  Scroll all the way down to the bottom of the page, and you will find the sign up box on the bottom right hand corner. During these sales, you'll be able to purchase a variety of stamps from a variety of international companies such as Frog's Whiskers Ink, Marianne Designs, Lea'bilities and a few others.

Thank you so much for stopping by today.  I hope I have inspired you to create a project and to come join the fun. Our challenges go live every other Thursday on our Facebook group.   All you have to do is to create a project and upload the pic to our challenge album.  There is a $15.00 prize for one lucky participant.

Till next time,
crafty hugs!