Showing posts with label Marianne Design. Show all posts

09 June 2025

Son's Birthday Card

Hello everyone.  Today I'd like to share the birthday card I made for my son's 29th birthday.  I always find it hard to make a card for a young man, but since he loves wolves, I thought using this Paper Boutique paper pad and matching toppers would work.  And I think it did because he thought his card was "cool" 😀


I found this tower pillar card tutorial on the Mixed Up Craft youtube channel HERE
I used the 7" x 5" version.


I used another topper, that also comes with the paper pack, on the back and used it to write my very short and sweet birthday message.

Crafty supplies used:
The Paper Boutique  Decorative Papers & Toppers - For Him
The Paper Boutique Coloured Card Collection - For Him
Marianne Design - Mirror cardstock
Marianne Design - Pin Numbers
Kat Scrappiness - Happy Birthday w/Shadow

That's all for today, folks.  Thanks so much for stopping by.

Till next time.

Crafty hugs,


08 January 2025

Crafty Gals Corner #263 - Fill in the Blank - Snow_____

     Hello crafting friends and welcome to our January challenge


Our challenge for this month is ~ Fill in the Blank - Snow_____ ~
(man, flake, globe, buddy, etc.)

 Our sponsors for this challenge are: 
(listed in alphabetical order) 

Prize ~ 3 Sets of Digis

* * * * * * * * * *
Prize ~ $10 Gift Certificate

A note from Rachelle Anne Miller:
I am an artist & designer living in the beautiful Adelaide Hills in South Australia with my husband and three amazing children! I love to create and am especially drawn to all things cute. I've worked on children's books, greeting cards, craft supplies, children's room décor, tech accessories, and more. I love to bring out joy and imagination in my art and create something a little different to inspire and make you smile.

* * * * * * * * * *
I made two cards for this challenge, one from each of our wonderful sponsors.  So let's start with Last Minute Manda. 


I used the very sweet pre-coloured digi set called Snow Bears Christmas, and created four cards.  Each card uses one of the 4 digis that come in this set. Here is a close up of the 4 images ...


  I used "Snow Buddies" for my challenge theme.  Using the Silhouette, I print and cut the images twice, then used foam square to adhere the two layers together to add a little dimension to the card.


On the inside I used a leftover strip of  the patterned paper to add a little interest, and stamped my greeting.

  I also used the following materials to create these cards:
Recollections - 5.5" Square card base
Silhouette to print and cut.
Marianne Design - Snowflake Square
Spellbinders - Make it Merry Sentiments
DP - The Paper Studio - Foiled Snowflakes

For my second card, I used the adorable Woodland Snowman scene from RAM Stamps, and as you can see I also went with "Snow Buddies" as the theme for this card.


A close up of this sweet and adorable Winter scene.  

In addition to this lovely digi, I used the following products to create my card:

Silhouette - card base
Studio Light - Trees
Marianne Design - Slimline Icicles
Cottage Cutz - Merry Christmas w/Shadow

Thank you so much for stopping by today.  I would love to you see you play along with us.  You have until noon, CST, on 11 February 2025, to link your project to our challenge.

Crafty hugs,


31 December 2024

Christmas Crafts All Year 'Round ~ The Christmas Song

   Hello and welcome to this month's Christmas challenge at
 Christmas Crafts All Year 'Round.   Deanne, our team leader, has come up with awesome challenges for 2025.  It's all going to be about Christmas Songs and Christmas Carols.  


To kick off the year, our inspiration song for January's challenge is The Christmas Song.  That means that you can use any verse, phrase or word in the song to create your Christmas project.  Here are the lyrics of this song to inspire you ...

~ The Christmas Song ~
Chestnuts roasting on an open fire
Jack Frost nipping at your nose
Yule-tide carols being sung by a choir
Folks dressed up like Eskimos
Everybody knows a turkey and some mistletoe
Helps to make the season bright
Tiny tots with their eyes all aglow
Will find it hard to sleep tonight
They know that Santa's on his way
He's loaded lots of toys and goodies on his sleigh
And every mother's child is gonna spy
To see if reindeer really know how to fly
And so I'm offering this simple phrase
To kids from one to ninety-two
Although it's been said many times, many ways
Merry Christmas to you
And so I'm offering this simple phrase
To kids from one to ninety-two
Although it's been said many times, many ways
Merry Christmas, have a Merry Christmas
Merry Christmas to you

For my card, I chose ðŸŽµ Chestnuts roasting on an open fire ... ðŸŽµ 


These are the dies I used to create my card:
Marianne Design - Acorns & Chestnuts
Marianne Design - Stargate
Spellbinders - Christmas Cocktails


Image is from Google


Greeting is from the Noel Christmas Ornaments stamp set from JustRite Stamps.

Thanks so much for stopping by.  Now it's your turn to make a Christmas project,  and come play along with us.  You have till the end of the month to link your project to our blog at  Christmas Crafts All Year 'Round.

Happy New Year! May 2025 bring you all that makes smile!


13 November 2024

Crafty Gals Corner #261 ~ Anything Goes w/twist - 3+ Layers

    Hello crafting friends and welcome to our November challenge


Challenge #261 ~ Anything Goes w/optional twist of 3+ Layers

Our sponsors for this challenge are: 
(listed in alphabetical order) 


Prize:  2 digis, 1 pad of digital papers "mini"
and the possibility of being Special Guest DT

* * * * * * * * * *

SheepSki Designs
Prize ~ 3 Digital Images

* * * * * * * * * *
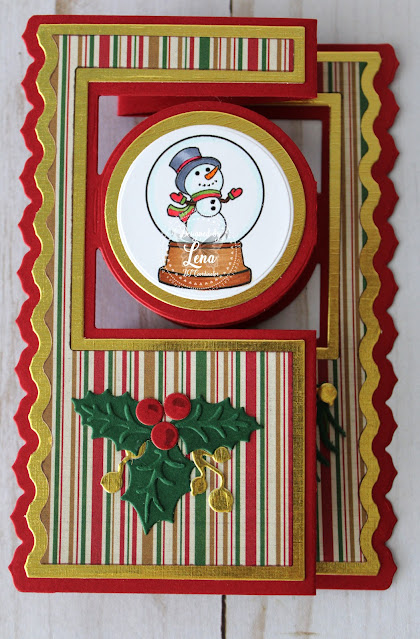
Using the Snow Globe No. 1 digi, from Mirtillamente Craft Shop, I created this card or our challenge.


The card base was cut using a die set from Studio Light Essentials called Circle Zigzag Card Shape. Red cardstock is from Recollections, gold cardstock and patterned paper are both from my scraps drawers and unfortunately I have no info on them.


For the embellishment I used
 Twigs - Marianne Design
Holly Leaves & Pine Branches - Lea'bilities


I used copic markers to colour the images and added a few accents with gel pens.


For this embellishment I used
Twigs - Marianne Design
Holly Leaves & Pine Branches - Lea'bilities


Full opened card measures 8" x 5.5". 


I added a gold and white mat to the back so that I had a place to stamp my greeting and write a small personal message.   I used the Tiny Tidings stamp set from Cardz TV to stamp the greeting.


When closed, the card measures 5.5" x 3" and fits perfectly into an A2 envelope.


Thank you so much for stopping by today.  I would love to you see you play along with us.  You have until noon, CST, on 10 December 2024, to link your project to our challenge.

Crafty hugs,


06 November 2024

The Paper Shelter #617 ~ The Little Ones

    Hello crafting friends and welcome to this week's challenge


Team A - our challenge this week is 
~ The Little Ones ~
(make something for a child)

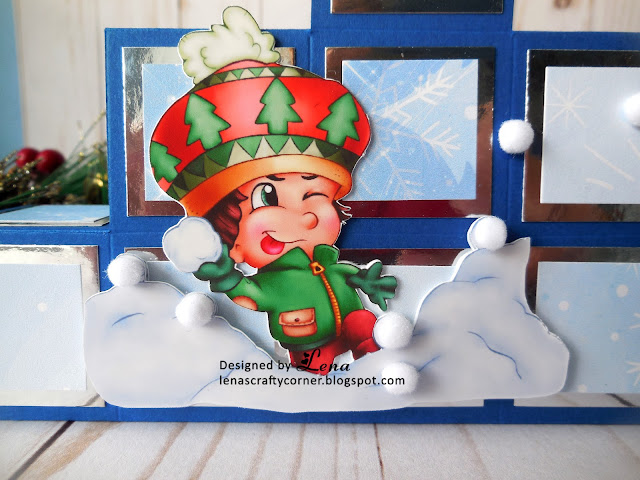
Using the Frosty Fun digi, I made this Double Block Step Card.
(For tutorial, please click on the link above.)


I print and cut the little guy a couple of times, on photo paper, and the adhered the two layers to each other using foam square.  I also print and cut the background that comes in this digi set and used it to cut out the background small squares.


Here is a close up of this mischievous little guy.  You can just see it on his face.  This is my grandson to a T, so this card is definitely for him for Christmas 😀


I traced the snowbank and print and cut it. I adhered it to the top adding an extra layer of dimension.


I used very small pom-poms as snow balls to add a little more dimension.


 I stamped my sentiment using Versafine Onyx Black ink.  Here is a list of the additional items I used to make this card.

Double Block Step Card - Mixed Up Craft
Dear Santa Stamp Set - Avery Elle
Text Banners - Marianne Design
Silver Mirror Cardstock - Hunkydory
Navy Cardstock - Bazzill

I love shaped cards and this is one that is always fun.  The big plus is that it folds flat making it easy to mail.

Thanks so much for stopping by today.  Before I leave, I would like to invite you to come play along with us.  Remember that The Paper Shelter has fabulous prizes up for grabs. Check out the details below ...


I do hope you will come join the fun and share your projects with us.
You'll find our challenge blog HERE.

Crafty hugs,


23 October 2024

The Paper Shelter #615 ~ Squares or/and Circles

  Hello crafting friends and welcome to this week's challenge


Team A - our challenge this week is 
~ Squares or Circles ~
(make a circle or square shaped card or include circles or squares on your project)

For this week's challenge, I made a Halloween card for a very special young lady in my life, using the very cute  Impish Halloween Lover digi set.


I went with squares for my project.  Not only did I make a square card, but I used the Layout Square die from Marianne Design and  included a few squares on my project too!


Here is a close up of this cutie and all the layers I made to add some dimension to my card.  I print and cut it out 5 times.  On 3 of these, I  just make the pic white so it would not waste ink.  I adhered these white layers together.  Next I printed the full image twice.  I adhered one of the layers to the other 3 so it would make it sturdy.  The second full image I adhered it to the existing layers with foam squares.  While I had the whole image on Silhouette, I traced just the sweets portion of the image, from the teddy to the kitty, and print and cut that small piece.  I adhered that on top, also using foam squares.  


You can't quite tell the dimension I achieved with all the layers from the pics, but maybe this one shows it a little better.


I cut out the Layered Square 5 times, out of black cardstock, and adhered each layer to each other using liquid glue.  Next I print the background that comes with this set and cut it out using the same die.  Then it was just a matter of paper piecing.


I used the background on the inside too, but added my greeting and used Silhouette's print and cut feature to cut it out.  I had printed a few extra sweets, so I added them to the inside of the card just for fun.


This is a 6" x 6" card.  A bit bigger than my normal size, but to be honest, I do like the way it turned out.  I'm hoping that my little Emma is going to love it too.

Yikes, Halloween is just around the corner and I still have a few cards to make.  I'd better get cracking!!  Now before I go, I would like to invite you to come play along with us.  Remember that The Paper Shelter has fabulous prizes up for grabs. Check out the details below ...


I do hope you will come join the fun and share your projects with us.
You'll find our challenge blog HERE.

Crafty hugs,