Showing posts with label Marianne Designs Stamps. Show all posts

19 June 2024

The Paper Shelter #601 ~ Hunky Dunky Birthday :-)

   Hello crafting friends and welcome to this week's challenge


Team A - our challenge this week is 
~ Summer Activities ~

I made this card, using the Lifeguard on Duty digi, with somone special in mind.  Someone who will appreciate a Hunky Dunky for her birthday 😀


Card base is a file from Silhouette, which I sized to be a 5.5" square card. To make my beach scene, I used several dies, most from Marianne Design.  These are Lifeguard House, Sandy Path, and Beach Houses.  I also used the Tropical Trees Background die set from Sunny Studio.  The stamped greeting is from the Mini Labels stamp set, also by Marianne Design.


Here is a close up of this cutie, which I cut out twice and used foam squares to adhere the two layers together. This adds a little dimension but not too much bulk as this is being mailed overseas.


I added a small palm tree to the inside which left me plenty of space of write my message. All cardstocks were bits and pieces from my scraps drawers.

Thanks so much for stopping by today.  Before I leave, I would like to invite you to come play along with us.  Remember that The Paper Shelter has fabulous prizes up for grabs. Check out the details below ...


I do hope you will come join the fun and share your projects with us.
You'll find our challenge blog HERE.

Crafty hugs,


30 December 2022

Fairy Stamper ~ Happy New Year!

 Hello crafting friends and welcome to my last Fairy Stamper Friday share!
  I have enjoyed this creative journey for a little over 3 years, but I decided to step down and reduce my DT projects for now.  Life is a little crazy at the moment and I'm not having as much time to craft as I would like.


Since it is the end of 2022 and the New Year celebrations are upon us this weekend, I made a Happy New Year card.  Take a look ...


I began by using a slimline piece of cardstock from the Fairy Hugs Slimline collection.  Next I stamped the fairies, then masked them and stamped the mushrooms.  Then I stamped the flowers.  When the ink was dry, I stamped the fireworks using VersaMark ink and used gold, blue and silver embossing powders to add colour and shine to them.  Lastly I added the glitter to the fairy wings and little "flowers" to the green vines.


On the inside, I kept it very simple by computer generating the greeting and ink blending around it. I used gold mirror cardstock to add a little shine to this Happy New Year card.

Now for the list of supplies I used, each linked to the Fairy Stamper store, for your convenience.

Fairy Hugs Papers - Moon Light Night
Marianne Designs - Wild Flowers
Fairy Hugs Glitter - Translucent Pearl
Distress Oxide Inks - Stormy Sky
VersaFine Clair Inks - Rain Forest, Acorn, Twilight

The Marianne Design stamp set was purchased during an International Stamps Special Order event that the Fairy Stamper store holds every once in a while. The best way to know about these is to subscribe to their newsletter HERE.

I would like to say a big thank you to Dani for having had me on his Fairy Stamper team, and to Anne Temple for being the best team leader a crafter could ask for.   Thank you both so much for adding so much fun and joy to my Fairy Stamper crafty journey.  I would also like to thank my teamies for always supporting me with their encouraging comments, their creative inspiration, and let's not forget the enabling! 😀

Thanks so much for stopping by today, crafting friends.  I hope you will come join us and share your magical creations on our Facebook group.

Happy New Year!


23 December 2022

Fairy Stamper ~ More Faux Pyrography Tags

 Hello friends and welcome back to my Fairy Stamper Friday share!


I've tried my hand at making more faux pyrography tags. Some came out pretty, others ... well I need a lot more practice :-)


Not much to tell. I will link to the tutorial video I followed, by Sandy Allnock.
The list of supplies I used are right after all the pics.  I purchased these unfinished wood ornaments on Amazon.  All the ribbons are from Michaels.


List of supplies used:
Marianne Designs - Polar Ice, Tiny's Pinetrees
Studio Light - Winter Charm
Distress Oxide ink - Vintage PhotoGround Espresso
VersaFine ink - Onyx Black

The Marianne Design and Studio Light stamps were purchased during an International Stamps Special Order event that the Fairy Stamper store holds every once in a while. The best way to know about these is to subscribe to their newsletter HERE.

Thanks so much for stopping by today.  I hope you will come join us and share your magical creations on our Facebook group.

Till next time,


21 October 2022

Fairy Stamper ~ Skating by with a Christmas Hello

 Hello friends and welcome back to my Fairy Stamper Friday share!


I realized that I still need quite a few more Christmas cards, so here is the beautiful and graceful Arabella, from Fairy Hugs Stamps, skating by with a Christmas greeting from our home to yours!


I began by stamping Arabella and then created a mask for her and for the snowy ground. Next I inked the sky with a light blue and then masked off the moon as well.  Then using a darker shade of blue ink, I finished the rest of the sky. I didn't want a bright white moon as I wanted the focus to be on Arabella instead of Santa and his reindeer. When the sky was done, I removed all the masks, stamped the landscape and added colour to Arabella.  I added a little "frozen river" so she could have some smooth skating :-) Lastly, I stamped and coloured the lanterns.

 
On the inside, I printed the greeting and stamped a few more lanterns to the snowy banks for continuity of theme of the card. 

The landscape, lanterns, and Santa stamps are from Marianne Design. These are sold during the International Stamps Special Order events that the Fairy Stamper store holds every once in a while. The best way to know about these is to subscribe to the newsletter HERE.

Thanks so much for stopping by today.  I hope you will come play along with us and share your magical creations on our Facebook group.

Till next time,
crafty hugs!

26 August 2022

Fairy Stamper ~ Doria's Treasure

Happy Friday crafting friends, and welcome back to my Fairy Stamper Friday share!


 While exploring the ocean floor,  Doria came upon this chest filled with treasure.
How extremely lucky can one mermaid be?


After cutting out all the layers of the Message in the Bottle Stencil, I began to build my scene by stamping and masking a few elements to give it a lil bit of  the 3D effect. I used a piece of Fairy Hugs paper to help with the background colours.  I used a combination of VersaFine Clair and Memento inks.  I used glaze gel pens to add colour to the treasure, as well as Doria's tail.   On the inside, I kept it very simple by just stamping another piece of coral and inking it blue around the edges. Lastly I stamped the sentiment.

Now for the list of supplies I used, each one to the Fairy Stamper store, for your convenience.

Fairy Hugs Stamps - Willow Vines, Fish School, Treasure Chest
Fairy Hugs Papers - Bumbletwinkle
Marianne Design - Message in a Bottle Stencil
Marianne Design - Coral

The Marianne Design supplies were purchased during an European Special Order event.  The best way to know about these events, that take place every so often, is to subscribe to the Fairy Stamper newsletter HERE.

Thanks so much for stopping by today.  I hope you will come play along with us and share your magical creations on our Facebook group.

Till next time,
crafty hugs!

01 July 2022

Fairy Stamper ~ Christmas Moose

 Hello friends and welcome back to my Fairy Stamper Friday share!


After a short break I'm back sharing a project with you every Friday of each month.
Since we are kicking off the month of July, and Christmas is my favourite time of year, I thought that "Christmas in July" would be the perfect way to start.


Using a background from an old calendar, I printed it out twice - one for the front and one for the back. On the front, I stamped the Moose, and Santa and his reindeer.  I made the moon by making a small circle mask and blending a little Faded Jeans DO ink.  As a final touch, I went over all the tree branches with a clear silver glitter pen.  I also contoured the moon using the same pen.


On the inside I stamped my greeting and that was that. The background is light enough that my personal message will still be legible. 

Now for the few supplies I used on this card, all linked to the Fairy Stamper store.


The Marianne Design and Frog's Whiskers Ink stamp sets were purchased during an European Stamps sales event that Fairy Stamper holds every so often.  During these special order events, you find stamps from many European companies such as Nellie's Choice, Craft Consortium, Marianne Designs, Frog's Whiskers Ink, Hefty Doodle, and a variety of others. The best way to know about these events is to subscribe to the Fairy Stamper newsletter HERE. 😀

Thanks so much for stopping by today.  I hope you will come play along with us. Our challenges go live on the first Thursday of each month on our Facebook group.   All you have to do is to create a project using your stamps, and upload the pic to our challenge album.  There is a prize drawn for one lucky crafter, at the end of every challenge. 😀

Till next time,
crafty hugs!

21 January 2022

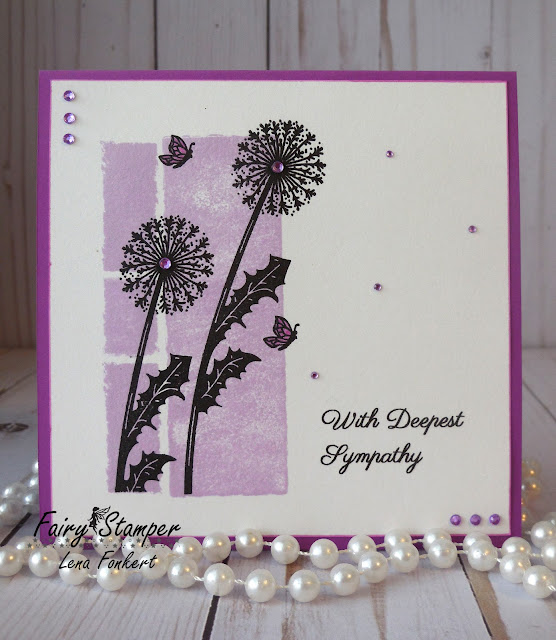
Fairy Stamper ~ Sympathy Card

   Hello friends and welcome to my Fairy Stamper Friday share!


I have a Sympathy card to share with you today.  Unfortunately, we just need one of these cards every now and then.


I began by stamping the purple blocks using Distress Oxide Milled Lavender ink.
Next, I stamped the dandelions, the butterflies, and the sympathy sentiment using  Fairy Hugs Raven Black ink. As finishing touches, I coloured in the butterflies and added a few lavender rhinestones.

Now for the list of supplies used to make this card, each linked to the Fairy Stamper store, for your convenience.

Fairy Hugs Stamps ~ Dandelions, Sivelle (for the butterflies)
Marianne Design ~ Rectangles

The rectangles from Marianne Design are currently not available. The reason for this is that they were purchased during one Fairy Stamper's International Sales events. The best way to know about these events is to subscribe to the Fairy Stamper newsletter HERE.


Thank you so much for stopping by today.  I hope I have inspired you to create a project and to come join the fun. Our challenges go live on the first Thursday of each month on our Facebook group.   All you have to do is to create a project and upload the pic to our challenge album.  There is a $15.00 prize for one lucky crafter 😀

Till next time,
crafty hugs!

26 November 2021

Fairy Stamper ~ I Otterly Adore You

 Happy Friday crafting friends and welcome to my Fairy Stamper Friday Share.
I hope you all had many Blessings to be thankful for,  and that you had a wonderful Thanksgiving celebration with family and friends.


Did you catch the International Stamps sale at Fairy Stamper last weekend? I always purchase more than my fair share during these sales 😀  If you didn't, no worries.  Fairy Stamper has these sales every so often so you can catch it next time.  The best way to know about these sales is to subscribe to their newsletter HERE.  (Scroll down to the very bottom of the page)

Hubby and I have been married for 36 years - we celebrated our anniversary a couple of days ago. 
For this occasion, and using a few stamps purchased at one of the International Stamps sales events, I made this card for hubby.


I began by creating the background using the Burst Stencil (Tim Holtz) and the Waves Stencil (Stampendous).
Next I stamped and die cut the little otters and other tiny embellishments that come in the set. I used Memento ink for this because I find it is one of the few inks that works really well with copic markers.  Once all the bits and pieces were coloured, I arranged them on the card using foam dots on some to add a little dimension.  It looked a little bare, so I used a little seaweed  and a bit of coral to fill in the scene. 


I used the same materials in the same way to create a little scene on the inside, leaving plenty of space to write my message. As a finishing touch, I added glassy accents to the heart and the shells.  For the otters' eyes, I used a black Glaze pen.

Here is the list of supplies I used. I have linked some to the Fairy Stamper store. Some will not show up in the store right now, because like I mentioned above, they were purchased during an International Stamp sales event.  

Fairy Hugs Stamps - Ivy Seaweed
Heffy Doodle - Otter Side (Stamps & Dies) (International Stamp Sale)
Marianne Designs - Coral (International Stamp Sale)
Lea'bilities - Swan Family (dragonfly) (International Stamp Sale)
Memento Ink - Tuxedo Black (currently out of stock, but any dye ink will do)
VersaFine Clair Ink - Rain Forest, Warm Breeze

Thank you so much for stopping by today.  I hope I have inspired you to create a project and to come join the fun. Our challenges go live every other Thursday on our Facebook group.   All you have to do is to create a project and upload the pic to our challenge album.  There is a $15.00 prize for one lucky crafter 😀

Till next time,
crafty hugs!

01 October 2021

Fairy Stamper ~ O Christmas Tree, O Christmas Tree ...

... How lovely are your branches! 

Good morning all! I hope today is the start to a great weekend!


Being Friday, it is my turn to share a Fairy Stamper project this morning.

As I'm sure you have guessed by now, my card today involves a Christmas Tree.
And just in case you now have the song stuck in  your head, I will put the rest of the lyrics towards the bottom of this post :-)

But now onto my card ...


I began by stamping the Christmas tree in Rain Forest green, but masking the tip so that instead of the star, I could place one of the Condo Dwellers fairies on the top. I stamped her using Brilliance Ink in Galaxy Gold.  Next I inked in the snowbanks and stamped the candles, the gnome and the few extra ornaments. All that was left was to add colour. I used copic markers on the gnome and candles, and glaze pens on the all the Christmas Tree decorations.  Lastly, I added a little bit of glassy accents to the candle flames.


On the inside of the card, I used a RoseWood stamp called A Wonderful Year by Frog's Whiskers.

List of products used:
Fairy Hugs Stamps ~ Decorating Tree, Condo Dwellers 2
Marianne Designs Stamps ~ Gnomes
Frog's Whiskers Stamps ~ A Wonderful Year
Distress Oxide Inks
VersaFine Clair Inks
Memento Inks

You may find that certain stamps, I used today, are out of stock.  This is because Fairy Stamper has International Stamps sales events every so often.  It's during these times that I buy stamps and/or dies from Marianne Designs, Lea'bilities, Frog's Whiskers, and many others.  The best way to find out about these special order sales events is to subscribe to the Fairy Stamper newsletter. 

Thank you so much for stopping by today.  I hope I have inspired you to create a project and to come join the fun. Our challenges go live every other Thursday on our Facebook group.   All you have to do is to create a project and upload the pic to our challenge album.  There is a $15.00 prize for one lucky participant.

And as promised, here are the lyrics to one of the most beautiful Christmas Carols:

Till next time,
 crafty hugs!


27 August 2021

Fairy Stamper ~ Gnome Lady with Flower

    Hello everyone!  Welcome to my Fairy Stamper Friday share.


I purchased this gnome die a few months ago, and hadn't had a chance to play with it.
I decided that today was the day, so after die cutting her and adding colour, I decided to create a background scene for this cute little lady.


Because she carries such a long flower, I decided that a slimline card would be the most suitable size.
I began by inking the background using a stencil and distress oxide inks.  Next, I stamped the various elements to build up the scene and coloured them in using copic markers.
On the inside, I used the same stencil to ink in the background and stamped another couple of bunnies to continue with the meadow scene.

List of supplies used to make this card, each linked to the Fairy Stamper store, for your convenience.

Fairy Hugs Stamps - Bunnies
Marianne Design Stamps - Squirrels
Nellie's Choice - Spring Meadow, Rabbits, Flying Birds
Elizabeth Craft Designs - Snowstorm & Mounds Stencil
VersaFine Clair inks - Twilight, Shady Lane, Acorn
Distress Oxide inks - Tumbled Glass, Broken China, Mowed Lawn

Thank you so much for stopping by today.  I hope I have inspired you to create a project and to come join the fun. Our challenges go live every other Thursday on our Facebook group.   All you have to do is to create a project and upload the pic to our challenge album.  There is a $15.00 prize for one lucky participant.

Till next time,
crafty hugs!


24 July 2021

Fairy Stamper ~ Raphael, the Sea Turtle

    Hello crafting friends, and welcome to my Fairy Stamper Friday share, a day late.
I had it scheduled for yesterday, but the blogger gremlins came out to play :-)


For this card, I combined my love of stamping with my love of stitching on cards, and came up with this stitched/under the sea card.


The pattern for the stitching is one I adapted from an old Stitch & Do kit.
For the scene I used a scrap from beach themed scrapbook paper I had. I stamped Raphael in Rain Forest green and then used markers to add the some touches of brown to his shell. Next I stamped the Hanging Vines and the Bubbles.


On the inside, I stamped the Mini Turtle, a few more Hanging Vines, and more Bubbles to complete the scene.  I tried to match the colours on the inside mat to match the pattern paper from the front of the card.  I'm not sure that I was that successful, but I think it kinda works 😀

Now for the list of supplies I used, each linked to the Fairy Stamper store, for your convenience.

Fairy Hugs Stamps
Marianne Design Stamps
Coral (for the bubbles)
VersaFine Clair Inks
Rain Forest, Warm Breeze
Distress Oxide Inks

Thank you so much for stopping by.  I hope I have inspired you to create a project and come join the fun. Our challenges go live every other Thursday on our Facebook group.   All you have to do is to create a project and upload the pic to our challenge album.  There is a $15.00 prize for one lucky participant.

Till next time,
stay safe and well.