Showing posts with label Sue Wilson Dies. Show all posts

27 October 2022

You're Fangtastic!

Hello everyone. This is my last card for 2022. Whew! It has been fun though   ðŸ‘»


I made this wiper card for my little granddaughter. Halloween and all the spookies are not her favourite time of the year, so I thought I would make this batty card and keep things on the cute side for her.  I think she'll enjoy the little bat that peeks out when she pulls the card open 👻


And, just like the card I made for my grandson, this one also glows in the dark.  I put the glow paste on the little stars. I used a black glaze pen for the eyes of the bats and the spiders, and crystal accents on the little pumpkin buckets.  So sorry for this awful pic, but I think you can see the effect of the stars.  I really do need some photography lessons.  I'm okay with the point and shoot, but anything more is beyond my capability!

Here is the list of supplies I used to make this card:
Made to Surprise - Z-Fold Wiper Card 5" x 7"
Lawn Fawn - Fangtastic Friends
Lawn Fawn - Fangtastic Friends Add-ons
Lawn Fawn - Glow in the Dark Paste
Kat Scrappiness - Spooky Happy Halloween
Sue Wilson Dies - Spooky Greetings

I'll be back with my last Halloween project for 2022 in the next couple of days.

Till then,
Happy Halloween


15 February 2022

Dies R Us # 187 ~ You're Roar-some!

 Hello everyone and welcome.  A new challenge begins today at Dies R Us.


Challenge #187 ~ Valentine/Love! 
(Our only requirement for you to play along with us is that you use a die,
 sold at the Dies R Us store, on your project.) 

This year I made a little something different for my grandson. The cutie pie is 4 years old and loves dinosaurs.  So with this in mind, I came up with this Valentine card for him.  


A quick card, it was not, but I think it turned out really cute, so it was worth all the time it took to die cut all the little bits and pieces and put them together to create just the scene I wanted.

On the inside, I followed the same theme and made an arrangement using tropical leaves, berries and sticks to create the sentiment. Although it turned out larger that I had first planned, there is still plenty of space for me to write my message.

Here is the list of crafty goodies I used to make this card, each linked to the Dies R Us store for your convenience.  A few of the dies I used are not in stock right now because I purchased them during one of the International Dies sale events that Dies R Us has every so often.  The best way to know about these special order events is to subscribe to the Dies R Us newsletter.

Marianne Designs - Dinosaurs (COL1400) - International Dies Sale Event
Marianne Designs - Dinosaurs (COL1499) - International Dies Sale Event

So what do you all think about my out of the norm Valentine card? The little guy loved it, so this grandma's mission was accomplished. 😀  Thanks so much for stopping by and spending a little of your day with me.  I hope I was able to inspire you to create a project, and  play along with us at the Dies R Us Challenges for your chance to win a gift certificate to the Dies R Us Store.  A new challenge begins on the 1st and 15th of each month.  There is a prize to be won with every challenge.  Visit our challenge blog, where my team mates showcase their creations to provide you with more inspiration.  Be sure to follow us on Facebook and Pinterest too.  


And don't forget to visit our sister store, Didi Crafts.  It has warehouses in the US and Canada. This means that our Canadian friends no longer have to worry about huge taxes or expensive shipping fees.  It has some products that are the same as Dies R Us, but in addition, it carries international dies,  and other crafty supplies for a variety of crafts.  Go take a peek and be pleasantly surprised!

Crafty hugs,


01 November 2021

Dies R Us #180 ~ Peace on Earth

 Hello everyone, and welcome to our latest challenge at Dies R Us.


Challenge #180 ~ Anything Goes! 
(As long as you use a die sold at the Dies R Us store) 

I have a simple and easy card to share with you today that is easy to mass produce in case you're short on time.  And it doesn't need a whole lot of supplies 😀


So let me tell you how simple it was to put this card together. I cut out the Swirling Rays out of silver mirror cardstock and back it with a sky blue piece of cardstock.  Next I cut out the Lace Winged Angel out of white cardstock and out of vellum. I also cut out the Peace banner out of the white cardstock and the halo out of gold mirror cardstock. Now it was just a matter of putting it all  together.


 I adhered the vellum cut out to the back of the white one, with the exception of the wings.  This way I have two sets of wings that gives the angel a lovely dimension. I outlined the angel's dress with a Silver Gelly Roll pen and adhered a tiny blue flower gem to add a little bit of interest.


On the inside, I left it simple. I just cut out the Merry Christmas once out of mirror silver cardstock and twice out of white cardstock scraps. By adhering all three layers together, I achieved a little added dimension which always looks pretty, at least in my opinion 😀

Now for the list of the dies I used, each linked to the Dies R Us store, for your convenience.

Yvonne Creations - Merry Christmas (inside)
Currently out of stock but any of THESE will work 

Thanks so much for stopping by today. I hope I was able to inspire you to create a project, and  play along with us at the Dies R Us Challenges for your chance to win a gift certificate to the Dies R Us Store.  A new challenge begins on the 1st and 15th of each month. Visit our challenge blog, where my team mates showcase their creations to give provide more inspiration.  Be sure to follow us on Facebook and Pinterest too.  

And don't forget to visit our sister store, Didi Crafts.  It has warehouses in the US and Canada. This means that our Canadian friends no longer have to worry about huge taxes or expensive shipping fees.  It has some products that are the same as Dies R Us, but in addition, it carries international dies,  and other crafty supplies for a variety of crafts.  Go take a peek and be pleasantly surprised!

Crafty hugs,
Lena

15 September 2021

Dies R Us Challenge #177 ~ Oriental Birthday

    Hello everyone, and welcome to our latest challenge at Dies R Us.

Challenge #177 ~ Anything Goes! 

(As long as you use a die sold at the Dies R Us store) 

I've been collecting a few Asian themed dies over time, and now found that I had just the right ones to put this birthday card together.


It was really easy to do.  I cut out all my bits and pieces in just two passes on my die cutting machine.  I have a Gemini so I always place a number of the dies I'm going to be using,  between the plates and cut them all at the same time.  Then it was just a matter of assembling them in the way that I liked.  Lastly it was time to do the inside, which was made using a few leftovers from the front of the card. The two little corner ornaments are the cut outs from the tassel die 😀 Below is the list of all the dies I used.  I have linked each to the Dies R Us store, for your convenience.


Thanks so much for stopping by today. I hope I was able to inspire you to create a project, and  play along with us at the Dies R Us Challenges for your chance to win a gift certificate to the Dies R Us Store.  A new challenge begins on the 1st and 15th of each month. Visit our challenge blog, where my team mates showcase their creations to give you a little more inspiration.  Be sure to follow us on Facebook and Pinterest too.  

And don't forget to visit our sister store, Didi Crafts.  It has warehouses in the US and Canada. This means that our Canadian friends no longer have to worry about huge taxes or expensive shipping fees.  It has some products that are the same as Dies R Us, but in addition, it carries international dies,  and other crafty supplies for a variety of crafts.  Go take a peek and be pleasantly surprised!

Till next time,
crafty hugs!


15 July 2021

Dies R Us #173 ~ Whiskey Card

     Hello everyone, and welcome to our latest challenge at Dies R Us.

Challenge #173 ~ Anything Goes! 
(As long as you use a die sold at the Dies R Us store)

My son asked me to make a card for dad's birthday, so I came up with this card.


I die cut the whiskey bottle and glasses (there is another one on the inside)  out of vellum paper. Next I die cut another few pieces so that I could add whiskey colouring. The whiskey is showing up a lot redder than it actually is in real life, but that's what happens when you need photography lessons :-) Anyway, once all the pieces were cut and coloured, I adhered them together using a Zyron sticker maker. This way, the entire reverse side of the vellum is covered in glue preventing the ugly glue marks you sometimes see thru the vellum.


I love this paper I found in my scraps drawer, as it has gold accents which perfectly go with the gold on the bottle and the sentiment.  I die cut the word three times and adhered all the layers together to give it dimension and add stability.  I wasn't happy that it didn't pop enough, so I added a vellum banner behind it.


For the inside, I die cut the same background and added a whiskey glass.  For the greeting, I cut out two ovals, one in gold mirror cardstock and one in white and adhered them together.

That was it. My son liked and so did dad so mission accomplished :-)

Here is the list of crafty supplies I used, each linked to the Dies R Us store for your convenience.


Thank you so much for stopping by today. I hope I was able to inspire you to create a project, and  play along with us at the Dies R Us Challenges for your chance to win a gift certificate to the Dies R Us Store.  A new challenge begins on the 1st and 15th of each month. Visit our challenge blog, where my team mates showcase their creations to give you a little more inspiration.  Be sure to follow us on Facebook and Pinterest too.

Before I go, let me mention that Didi Crafts is our sister with warehouses in the US and Canada. This means that our Canadian friends no longer have to worry about huge taxes or expensive shipping fees.  It has some products that are the same as Dies R Us, but in addition, it carries international dies,  and other crafty supplies for a variety of crafts.  Go take a peek and be pleasantly surprised!

Till next time,
crafty hugs!


01 July 2021

Dies R Us #172 ~ Father's Day Card

    Hello everyone, and welcome to our latest challenge at Dies R Us.

Challenge #172 ~ Anything Goes! 
(As long as you use a die sold at the Dies R Us store)

Although Christmas in July is in full swing, I would like to share the card I made for my hubby for Father's Day.


As you know, Dies R Us has Special Order sales events. During these times you can purchase a variety of International dies from companies such as Marianne Designs, Lea'bilities, Joy! Crafts, and a few others.  I normally buy more than my fair share and used a couple to make this card for hubby.


After picking a few papers from Pion Design, My Beloved Son collection, I die cut the mats I wanted and adhered them to the card. Next I cut out all the pieces for the watch and put it together. The shoes and the hat cut out as a single piece.  If you leave the die cut in the die, you can then use any ink you want to sponge in the details. I cut out the Celebrate word 3 times and stacked them to give it a little bit of dimension. The champagne bottle was an image from Google that I uploaded to the Silhouette, traced it and cut it out.

I have listed the dies I used and linked them to the Dies R Us store for your convenience.  You may not find some of these dies in stock right now, because like I said above, most of these are only available during the Special Order sales events.  But you can add to your wish list. The best way to know about these Special Order sales is to subscribe to the Dies R Us newsletter.

Thank you so much for stopping by today. I hope I was able to inspire you to create a project, and  play along with us at the Dies R Us Challenges for your chance to win a gift certificate to the Dies R Us Store.  A new challenge begins on the 1st and 15th of each month. Visit our challenge blog, where my team mates showcase their creations to give you a little more inspiration.  Be sure to follow us on Facebook and Pinterest too.

Before I go, let me mention that Didi Crafts is our sister with warehouses in the US and Canada. This means that our Canadian friends no longer have to worry about huge taxes or expensive shipping fees.  It has some products that are the same as Dies R Us, but in addition, it carries international dies,  and other crafty supplies for a variety of crafts.  Go take a peek and be pleasantly surprised!

Till next time,
crafty hugs!


31 March 2018

Celebrations!

Welcome back crafting friends. I'm at the Dies R Us Inspiration Blog, today, to share a birthday card with you.
It's my last post as DT member for Dies R Us, and although I already miss this team, I'm happy to know that you will have many wonderful projects to look forward to from the new DT members.
It's also my birthday today, so I thought today's post should be all about celebrations :-) 


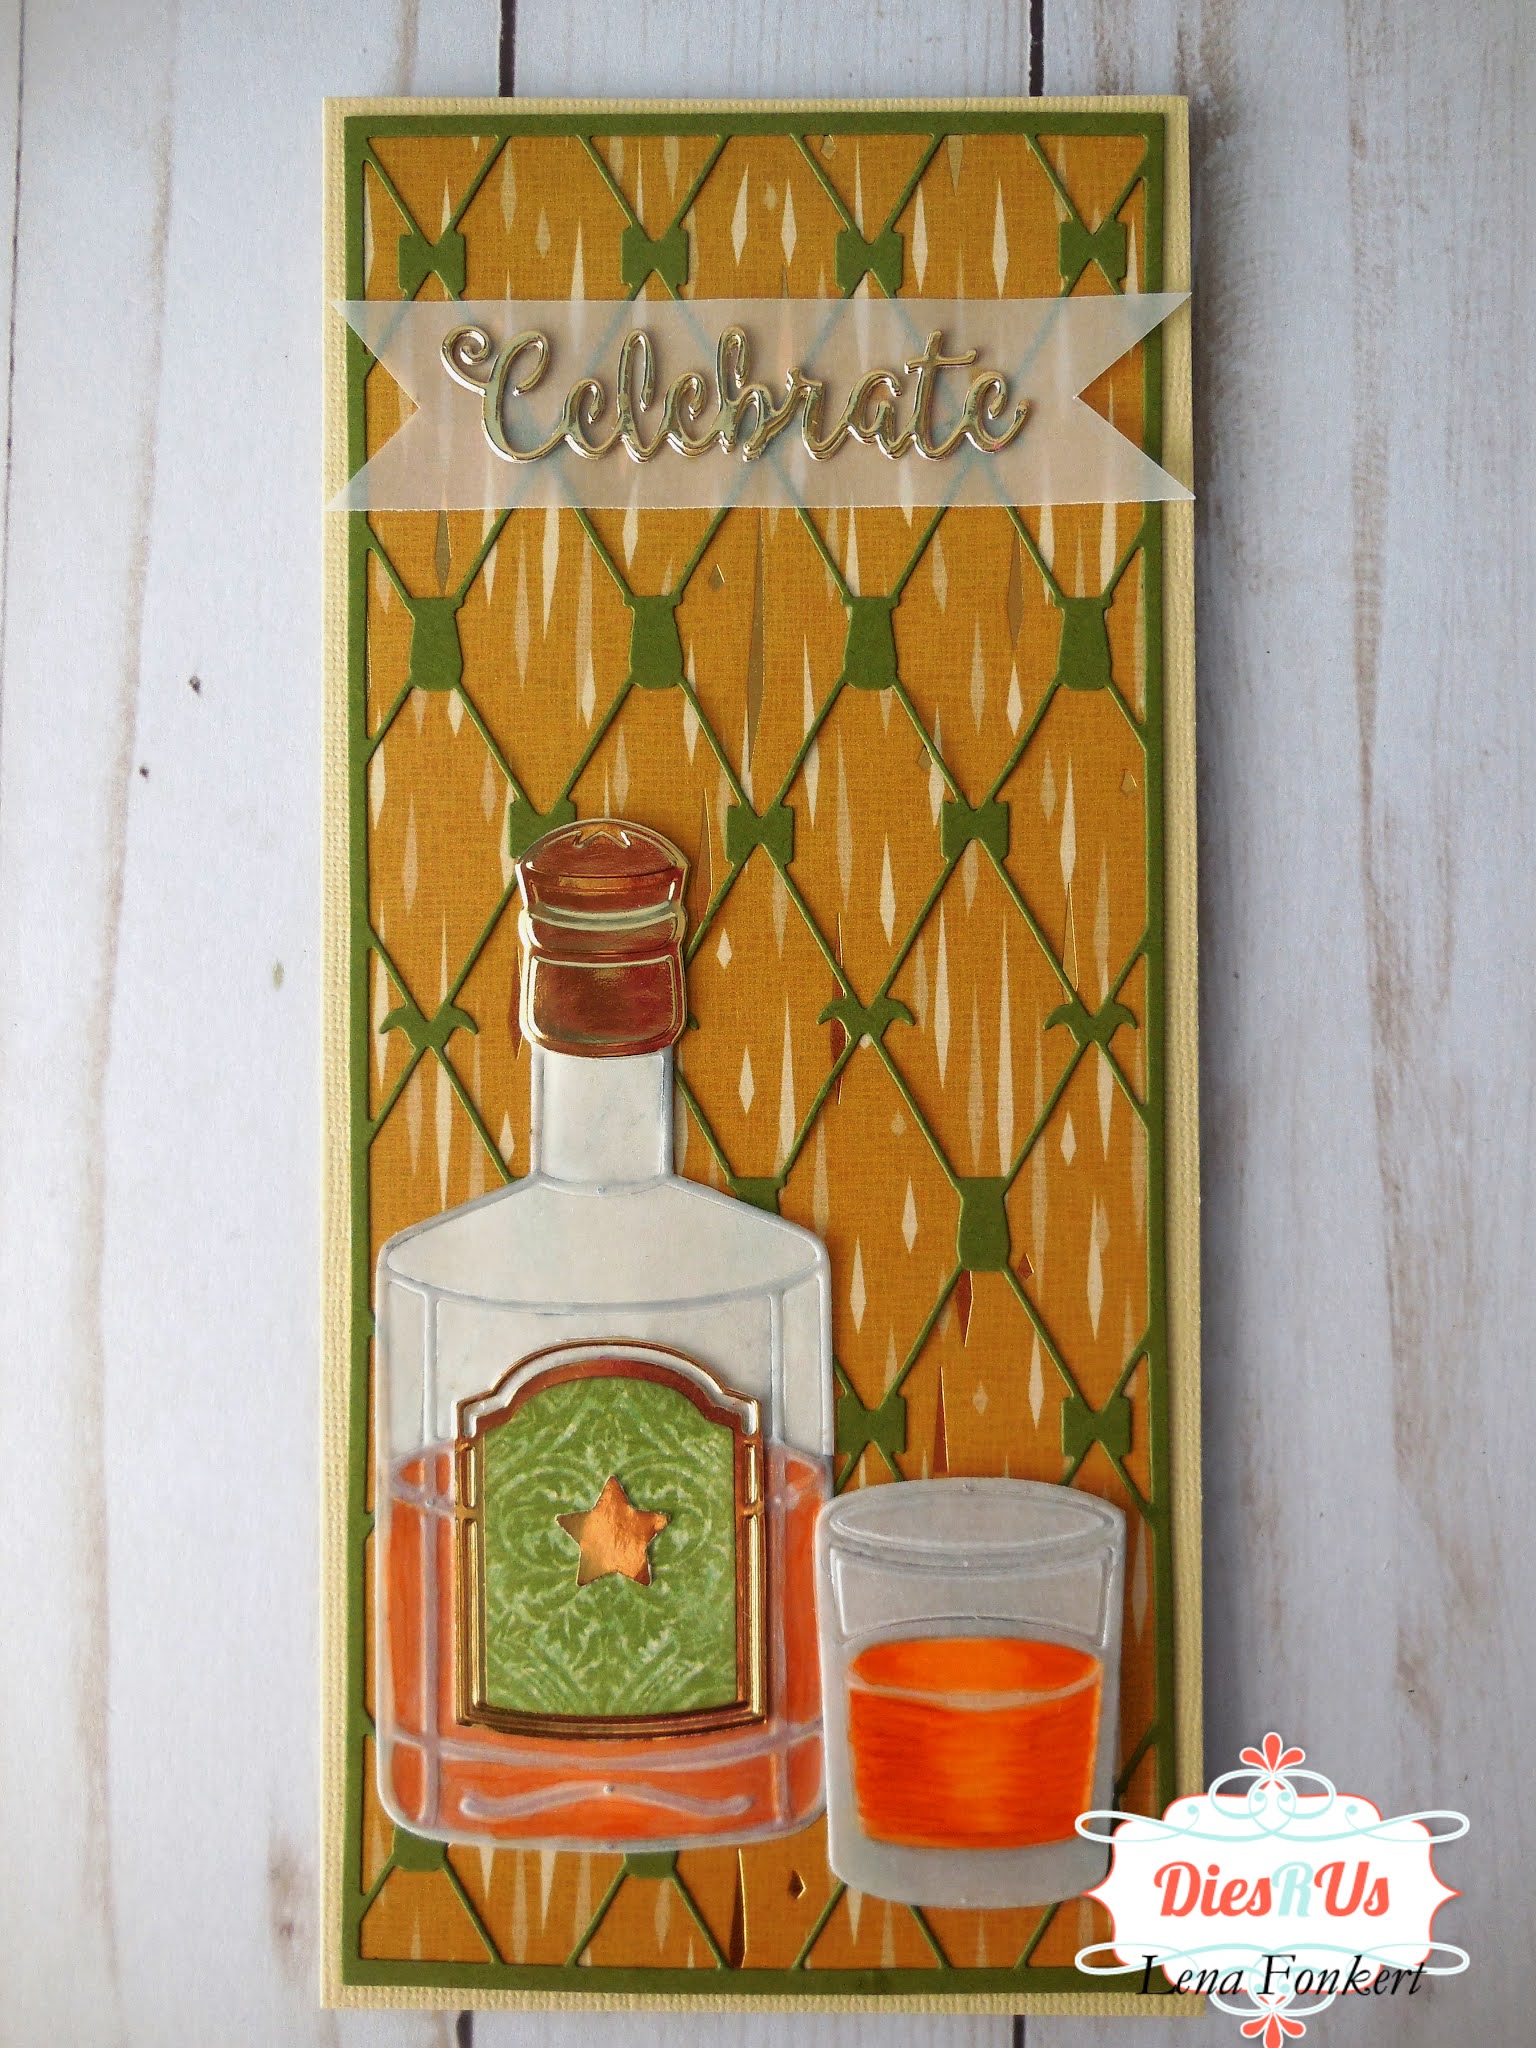
Let's begin with a nice cosmopolitan cocktail to kick it off, shall we? :-)
 Friends, this awesome die set is from Sue Wilson and it's called 3D Cosmopolitan Cocktail.


 This set comes with a die that allows you to turn the glass into a 3D cut. I cut mine out of vellum to give it a frosted look.  Since my card is going to be mailed overseas, I flattened my glass a little, but the 3D effect is still somewhat visible! This allows you to place the straw and the olive inside the "glass".  Doesn't it look realistic?


I began with a card base from that measures 6.5" x 5" when folded. On the front side, I placed Sue Wilson's Lyra die with the cut on the outside of the card.  This makes a beautiful and elegant edge.  This die set consists of 3 pieces, two cutting edges and flourish piece. This means that you can create different edge designs, create an inlay piece by not using any of the cutting edgers, or a stand alone flourish by using both cutting edgers.  Not sure what I mean?  I'll post a pic for you at the end of this post. 


Next, I cut out all the bits and pieces for my drink, and then it's just a matter of putting all the pieces together which is really easy peasy!


To make it look more realistic, I placed glue along the edge of the "glass" and spread some chunky glass glitter over it, to give the idea of a sugared glass :-)


I cut the word "Celebrate" twice and stacked them upon each other for a bit of dimension. I also used a foam dot for the strawberry.  All that was left was to do was to scatter a few sequins to add to the whole party atmosphere :-)


On the inside I used a sentiment and a balloon stamp, as well as a panel of the pink shiny card stock to make the Lyra flourish pop.


This card stock is really hard to photograph, but I wanted to give you an idea of how it shines, so here is another pic.

Now as promised, here are the pics showing you how the Lyra die works:


As you can see, it consists of 3 pieces. Two cutting edgers and a centre flourish.


And here are all the different cuts you can make with this die set by using the different combinations.

To end this post, here a quick recap of the supplies I used to make this card, with links to the Dies R Us store for your convenience:


It's been a great pleasure and honour to have been part of this awesome team and having had the opportunity to share my creations with you.  I hope that I was able to inspire you to use your dies, and to create a project to play along at the Dies R Us Challenge Blog for your chance to win a gift voucher to the Dies R Us Store.   A new challenge begins on the first and fifteenth of every month.

For your convenience, all the important Dies R Us links are provided below.


Click below for:

Hugs,

02 February 2018

More Sympathy Cards

Hello crafting friends.  I'm on the Dies R Us inspiration blog today sharing some more sympathy cards.  It's a rather long post, so grab a cup o'java and enjoy.  As I mentioned before, these are the hardest cards for me to make and having to make 3 as the New Year starts was definitely not easy.  A sweet friend told me that she always keeps some on hand because that way, when she has to send one out, it's not so heartbreaking to make them. Well, that made a lot of sense to me so I made an extra one that I'm also going to share with you.


So for my first card, I used the Garden Classic Lace Frame from Jeanine's Art.  While the cardstock was still in the die, I used a dauber to sponge Memento Lilac Posies ink on all the embossed surfaces. The image was cut from a 3D decoupage sheet.  In order to add a little bit of green to go with my image, I coloured the cutout leaves green and paper pieced them back into the frame. Lastly, I added a little gem as a finishing touch. This card measures 5.5" x 5.5".


For the inside of my card, I printed the sentiment and added a little butterfly which was cut using a die from Marianne Designs called Butterfly BorderRemember that, every so often, Dies R Us runs a big sale on international dies. During these times, you will find dies from companies such as Marianne Designs, Lea'bilities, Joy Crafts, etc. The best way to know about these fabulous sales is to subscribe to the Dies R Us Newsletter. If you scroll down to the bottom of the page, you will be able to enter your email address and be put on their mailing list.


For my second card, I used the Striplet - Rococo Die from Sue Wilson and cut it out twice on the front of the card. I used a piece of powder blue cardstock for my backing.. Next I added two Sprigs from Spellbinders and placed them facing away from each other. Using a Zig two-way glue pen, I adhered them to the card, leaving the end leaves loose to add movement to the sprigs. Lastly, I cut, shaped and glued  the layers of the flower together and placed it as the focal point. This die always makes beautiful flowers and they're so easy to put together too!  It's a die from Marianne Designs called Anja's Flower. This card measures 6.5" x 5".


Here's a quick tip on how to line up your cuts perfectly when using striplet dies. Place the die on the one side of the card and make small pencil markings to show you the outline of where the first cut is going to be. Then place the die on the other side and use the pencil markings to align the second cut. 


For the inside of this card, I stamped the sentiment using Memento Tuxedo Black ink, and used another one of the butterflies from Marianne Designs. 
Now, I did mentioned that I had made 3 Sympathy cards since the beginning of the year, right? Well, if you missed the first one and want to take a peek, you can click HERE to read the post about it.


And now to share the first card I made for my stash.  I stitched the borders on this card and then used the  butterflies from Marianne Designs as the focal point. I cut them twice for a little more dimension. To finish it off I added a few lilac gems. This is a 5.5" x 5.5" card.


Like with the other cards, I kept the inside very simple. I printed this sentiment and then trimmed the cardstock to the correct size. I had a little butterfly left over, so I used it on the inside of the card to add a little more interest.

Now for a quick recap of the dies I used, with links to the Dies R Us store:

Thank you for stopping by today.  I hope I was able to inspire you to use your dies, create a project, and come play along at the Dies R Us Challenge Blog for your chance to win a gift voucher to the Dies R Us Store.  A new challenge begins on the first and fifteenth of every month.
 For your convenience, all the important Dies R Us links are provided below.


Click below for:

Hugs,