Showing posts with label Tropical. Show all posts

12 August 2026

Crafty Gals Corner #279 ~ Anything Goes w/twist - Summer Vibes

    Hello crafting friends and welcome to our monthly challenge
 at Crafty Gals Corner! I hope you're all enjoying the end of your Summer!


  The theme for our challenge this month is

~ Anything Goes w/optional twist - Summer Vibes ~

It was my daughter's birthday last week and since she loves everything to do with the sea, I created this easel card for her.


When closed for mailing, this card measures 5.5" x 5.5".  There is a little bulk to it with the sea shells but since I hand delivered it, it was not a problem.  If I had planned on mailing it, I would have used sea shell dies instead of using the real small shells.

These are the crafty supplies I used to make this card:
Marianne Design - Sea Shells Stitching Border
DMC Embroidery Floss - various colours used (3 strands)
Cottage Cutz - Sand Dollar
Memory Box - Seahorses
Sue Wilson - Aquatic Plants
Joy! Crafts - Bille's Coral
Cardz TV - Mini Messages

Thanks so much for stopping by today.  We would love to see you play along with us.   You have until noon, CST, on 8 September 2026, to link your project to

Hugs,

08 June 2025

It's a Stitch Birthday

 My grandson loves Lilo & Stitch so I decided to make him this card for his birthday.


It was very easy to put together although there was a bunch of printing and cutting.  Thank goodness for the Silhouette  It just makes things so much easier! 😀  This centre fold card base is also a file from Silhouette. Stitch and the tropical flowers border were both images found on Google and royalty free.


I print Stitch onto photo paper 5 times and then adhered each layer to each other.  This adds a little bulk thus creating a little dimension.

For some reason the pic of the inside of the card is all blurry so not worth posting and since the card has been given away, I can't take a pic. But it was pretty simple.  I just cut out the same red and white fancy panels and adhered them to the inside with a stamped Happy Birthday greeting.

Thanks so much for stopping by today.  I hope you'll come back soon for another visit.

Crafty hugs,


19 June 2024

The Paper Shelter #601 ~ Hunky Dunky Birthday :-)

   Hello crafting friends and welcome to this week's challenge


Team A - our challenge this week is 
~ Summer Activities ~

I made this card, using the Lifeguard on Duty digi, with somone special in mind.  Someone who will appreciate a Hunky Dunky for her birthday 😀


Card base is a file from Silhouette, which I sized to be a 5.5" square card. To make my beach scene, I used several dies, most from Marianne Design.  These are Lifeguard House, Sandy Path, and Beach Houses.  I also used the Tropical Trees Background die set from Sunny Studio.  The stamped greeting is from the Mini Labels stamp set, also by Marianne Design.


Here is a close up of this cutie, which I cut out twice and used foam squares to adhere the two layers together. This adds a little dimension but not too much bulk as this is being mailed overseas.


I added a small palm tree to the inside which left me plenty of space of write my message. All cardstocks were bits and pieces from my scraps drawers.

Thanks so much for stopping by today.  Before I leave, I would like to invite you to come play along with us.  Remember that The Paper Shelter has fabulous prizes up for grabs. Check out the details below ...


I do hope you will come join the fun and share your projects with us.
You'll find our challenge blog HERE.

Crafty hugs,


08 June 2024

Beach Fairy Garden

Hi everyone.  If you're a follower of my blog, then you know that my favourite Season is Summer, that it's just never too hot for me and that I absolutely love, love the beach and could happily have made a career as a Beach Bum 😁 

When I'm not at the beach, I'm normally thinking about it, planning our next trip to it, or just wishing that I was there.  So, this is what I was busy with today ... my very own Beach Fairy Garden!


My husband filled the pot about 3/4 full with some sort of foam spray that solidified. This filled up the pot very nicely and keeps it light.  Then I layered about 2" of sand sloping it down towards the "sea".  I used aqua crushed glass for the ocean.  The beach house was purchased at Hobby Lobby and it was all built from there.  All the palm trees, grasses, ferns, and chair set were purchased from Amazon - most under the "cake toppers" section.  The mermaid, turtles and driftwood were also purchased from Amazon but under the "doll house" section.  The small section of fence, sea shells and lights are from my stash.

It took me a while to get everything just the way I had envisioned it, but I must admit that I enjoyed every minute of it, and I'm quite please with the way it came out.  Now, every time I walk by it, I mentally count the sleeps till I'm at the beach again, and God willing, this year it will be without Covid or any of it's cousins!

I hope you enjoyed your visit today.
Crafty hugs,


22 May 2024

The Paper Shelter #597 ~ Sing a New Song

  Hello crafting friends and welcome to this week's challenge


Team A - our challenge this week is 
~ Sing a New Song ~
(Be inspired by a song/something musical/singing/musical instrument)

When I saw this cute little fairy getting A Nice Tan, in her yellow bikini, the song that came to my mind was
 𝅘𝅥𝅯𝅘𝅥𝅯𝅘𝅥𝅯 ... it was an Itsy Bitsy Teeny Weeny Yellow Polka Dot Bikini, that she wore for the first time today ... 𝅘𝅥𝅯𝅘𝅥𝅯𝅘𝅥𝅯
and yes, it is just a tad before my time, but I grew up jamming to it! 😀  And although this fairy's bikini doesn't have polka dots, it was this song that inspired the creation of this card.


I used a Silhouette Design for this background on this card.


I printed the fairy using photo paper to get a crisper image and brigher colours.  My printer is an older model, so I find that using photo paper helps when printing pre-coloured digi images.


I printed the fairy twice, then did some snipping off of the leaf and adhered the layers to each other using foam squares.  I used the same foam squares, to offset a couple of the hibiscus flowers, in order to add a little dimension to the card.  I normally use the 1 mm foam squares because they add dimension without adding too much bulk.  


On the inside, I cut a few more elements from the original .cut file and made a small arrangement to adorn the heart.  I liked the idea of continuing with the tropical theme on the inside.  The Happy Birthday was generated and cut using the Silhouette as well.


And here is a last look at this 5.5" square card.  I love everything tropical, so I must admit that I'm very happy with how this card turned out.  It makes me feel happy 😀

Thanks so much for stopping by today.  Before I leave, I would like to invite you to come play along with us.  Remember that The Paper Shelter offers a $30 gift certifcate to one lucky winner!  In order to get this prize, you must use a product from The Paper Shelter.  However, if you don't use a product from The Paper Shelter, you still stand a chance of winning 3 digis of your choice. 


I do hope you will come join the fun and share your projects with us.
You will find our challenge blog HERE.

Crafty hugs,

16 September 2022

Fairy Stamper ~ The Majestic Luna & Friends

 Hello friends and welcome back to my Fairy Stamper Friday share!


Do you think that if I keep making Summer cards, I can keep Winter away?
Now there's a happy thought for me 😀


Those two little turtles have become Luna's constant companions.  I think they feel safe in her majestic presence 😀  To make this card, I used several stamps from a few companies, all available at the Fairy Stamper store.  A little masking here and there and a little colouring and this card came together in very little time.  It's easy when you use one of the Fairy Hugs pre made backgrounds.

As always, here is the list of supplies I used to make this card, each linked to the
Fairy Stamper store, for your convenience.

Fairy Hugs Papers - Deep Blue Sea
Amy Design Stamps - Friendly Frogs

The Marianne Design supplies were purchased during an European Special Order event.  The best way to know about these events, that take place every so often, is to subscribe to the Fairy Stamper newsletter HERE.

Thanks so much for stopping by today.  I hope you will come play along with us and share your magical creations on our Facebook group.

Till next time,
crafty hugs!

06 September 2022

KS ~ Waterside Fun

 Hello everyone.  Although it's September, our temps are still very sunny and toasty, and since I'm not quite ready to say goodbye to Summer, here is another beach card.


This was such a simple and quick card to put together using Kat Scrappiness' Waterside card builder die.
All I did was run the die thru my machine a few times using different coloured card stock and then piece it together to make it look just as I wanted.  Then, I adhered a little surfboard and flippers just to add a little something extra. For the surf, I used Glitter Snow.  Works great on snow scenes and seaside scenes. On the inside, I added the Happy Birthday w/Shadow, also by Kat Scrappiness, and that was it.  This is an A2 size card which is not my norm, but I think it came out cute 😀

Before I leave I wanted to let you know that Kat Scrappiness has just had a new release of crafty goodness.   Come check it out HERE.


Thanks for stopping by today.
Till next time ...


26 August 2022

Fairy Stamper ~ Doria's Treasure

Happy Friday crafting friends, and welcome back to my Fairy Stamper Friday share!


 While exploring the ocean floor,  Doria came upon this chest filled with treasure.
How extremely lucky can one mermaid be?


After cutting out all the layers of the Message in the Bottle Stencil, I began to build my scene by stamping and masking a few elements to give it a lil bit of  the 3D effect. I used a piece of Fairy Hugs paper to help with the background colours.  I used a combination of VersaFine Clair and Memento inks.  I used glaze gel pens to add colour to the treasure, as well as Doria's tail.   On the inside, I kept it very simple by just stamping another piece of coral and inking it blue around the edges. Lastly I stamped the sentiment.

Now for the list of supplies I used, each one to the Fairy Stamper store, for your convenience.

Fairy Hugs Stamps - Willow Vines, Fish School, Treasure Chest, 
Fairy Hugs Papers - Bumbletwinkle
Marianne Design - Message in a Bottle Stencil
Marianne Design - Coral

The Marianne Design supplies were purchased during an European Special Order event.  The best way to know about these events, that take place every so often, is to subscribe to the Fairy Stamper newsletter HERE.

Thanks so much for stopping by today.  I hope you will come play along with us and share your magical creations on our Facebook group.

Till next time,
crafty hugs!

08 August 2022

A Day at the Beach

I hope you're having a great Monday and that it's the start to an awesome week.

I have a summer card to share with you today.  I just became a member of the Small Die of the Month club at Spellbinders.  I normally don't do clubs, but I really liked this die and it doesn't seem that Spellbinders wants your first born in order to become a member either 😀

I had stitched this Seashells Border, from Marianne Designs, and was just waiting for the perfect way to add to it.  When I got this Day at the Beach die set, I thought that it would work well together.


 This turned out to be one of the cards I made for my daughter's birthday.  My mom had asked me to make a card for her, and since my daughter loves the beach, I thought this turned out perfectly.

I used the following supplies to make my card:

Marianne Designs - Stitched Sea Shells Border
Marianne Designs - Pin Numbers
Spellbinders - A Day at the Beach die set
Karen Burniston - Happy Birthday
Lawn Fawn - Sunray Background stencil
Silhouette - Coconut Drink
Craft Consortium Papers - Tropical Paradise - Bathing Suit
Cardstocks - Scraps drawers
Distress Oxide inks - Mustard Seed
Various colours of DMC embroidery floss

Thanks so much for spending a little time with me. I hope you come back again to visit soon. And if you have the time, I would love to read what you think by leaving me a comment. 

Till next time,


01 April 2022

Dies R Us #190 ~ Tropical Birthday

  Hello everyone and welcome.  A new challenge begins at Dies R Us, today.


Challenge #190 ~ Flowers/Spring
Our only requirement for you to play along with us, is that you use a die on your project that is sold at the Dies R Us store.  And, of course, that your project complies with our monthly theme 😀

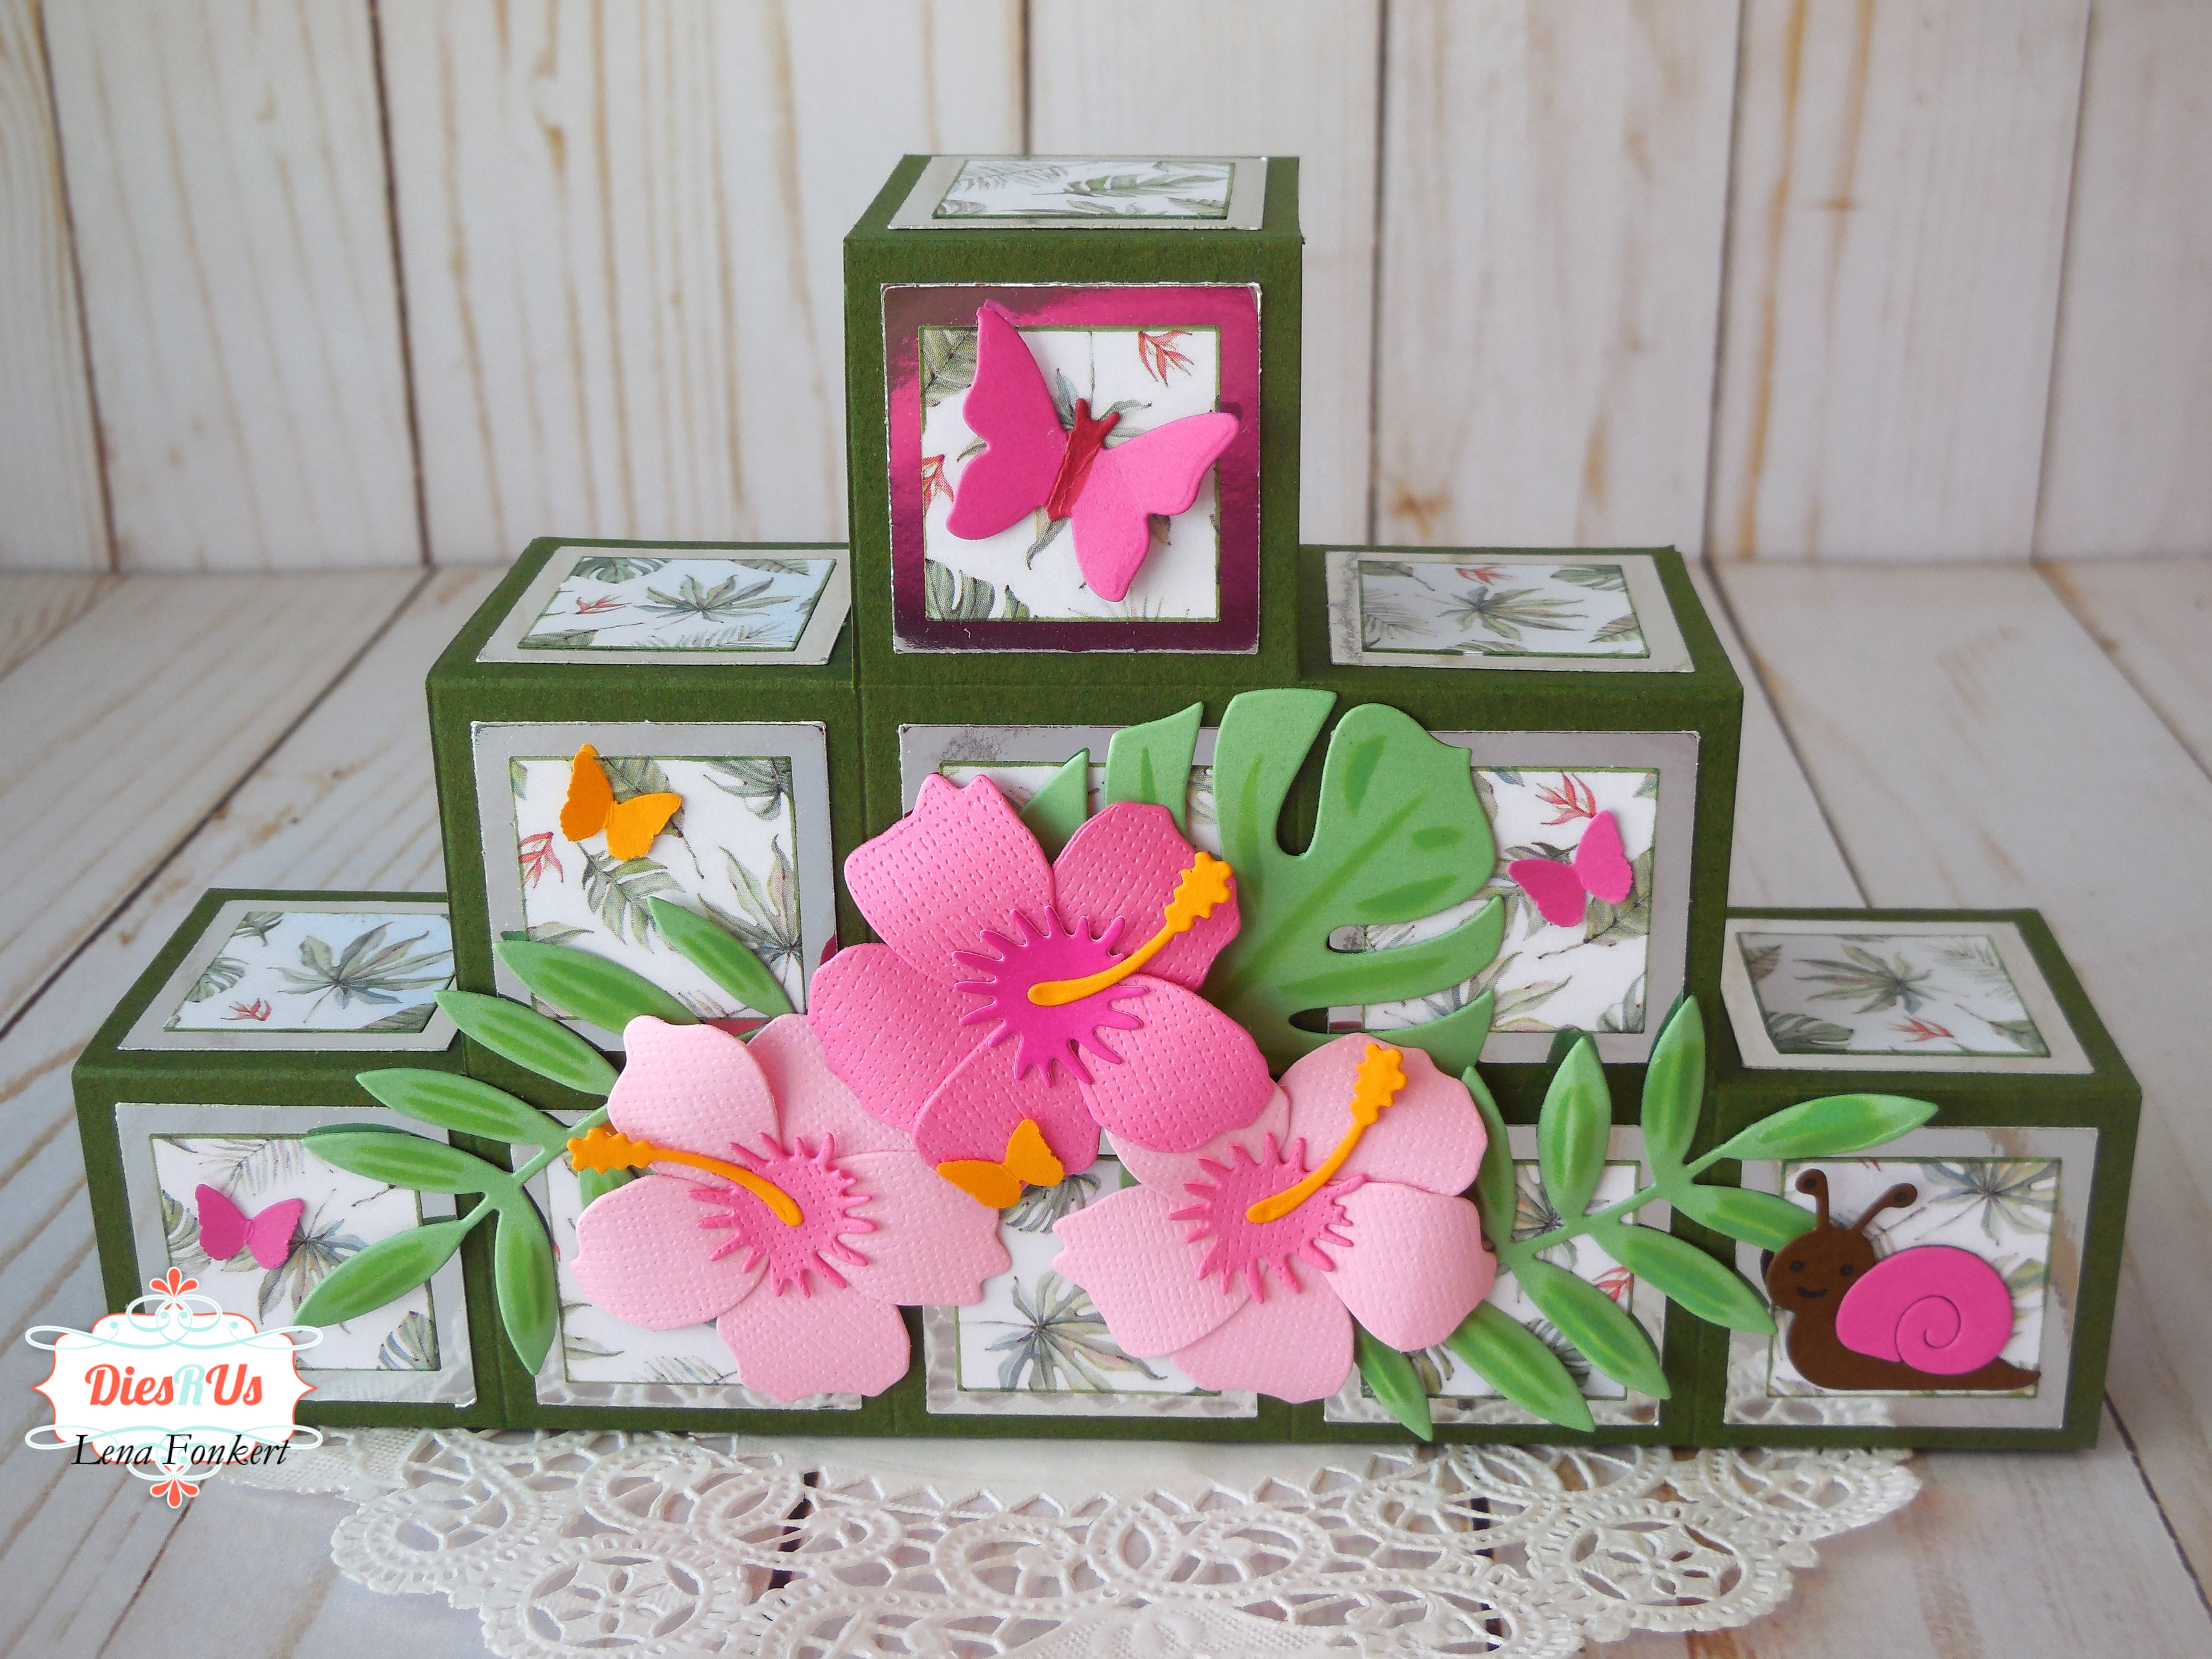
I love flowers, especially tropical flowers, so I decided to make this a tropical birthday card for a very special lady in my life 💓


I  made a Double Step Block card using papers from the Paper Boutique called Tropical Dreams.  If you would like to recreate this card, here is the tutorial by Sam Calcott.  
I cut out a few hibiscus flowers as well as a few of the tropical leaves that come in the die set by Marianne Designs.  When all flowers and leaves were glued down, I thought it needed a little extra something.  I thought the cute little snail  and a few butterflies were just perfect.
This card is pretty easy to make and so much fun to decorate.


Here is a top view of the card.  Since it is going overseas, I did not want to add a lot of bulk to it, so it is within the 1/4" thickness when laid flat.


On the back I made a plain panel so that I could stamp my greeting and write my personal message, but then saw this Happy Birthday die still laying on my desk from a previous project, and decided to use it instead.  Not a lot of space left for my message, but I can write real small when I have to 😉


Another great thing about this card is that it falls flat, making it easy to mail.  Now, I didn't have a large enough envelope on hand, so I decided to make my own, using an envelope punch board that Santa gave me for Christmas.  The finished size of the card is 7.5" x 4".  However, when laid it down flat, it measures 7.5" x 6", so yes, you either have to adjust your measurements to make it a tad smaller or you can use a larger envelope.  To be honest, it was quicker for me to make an envelope then to go thru all the math involved to reduce it in size!  😀


Now for the list of supplies I used. I have linked the dies to the Dies R Us store for your convenience.  

The Paper Boutique - Tropical Dreams
WRMK - Envelope Punch Board
The Paper Studio - The Basics Paper Pad (for envelope)
Green and mirror silver cardstocks - scraps drawer

I purchased the Marianne Design die during one of the International Dies sales events that Dies R Us have every so often.  The best way to know about these sales is to subscribe to their newsletter HERE. Scroll down the page and you'll find the sign up box on the left hand bar.

Thanks so much for stopping by and spending a little of your day with me.  I hope I was able to inspire you to create a project, and  play along with us at the Dies R Us Challenges for your chance to win a gift certificate to the Dies R Us Store.  A new challenge begins on the 1st and 15th of each month.  There is a prize to be won with every challenge, you could be the lucky winner! If you have a minute, please visit our challenge blog, where my team mates showcase their creations to provide you with some wonderful inspiration.  Be sure to follow us on Facebook and Pinterest too.  


And don't forget to visit our sister store, Didi Crafts.  It has warehouses in the US and Canada. This means that our Canadian friends no longer have to worry about huge taxes or expensive shipping fees.  It has some products that are the same as Dies R Us, but in addition, it carries international dies,  and other crafty supplies for a variety of crafts.  Go take a peek and be pleasantly surprised!

Crafty hugs,