Showing posts with label Fairy Hugs Inks. Show all posts

16 December 2022

Fairy Stamper ~ Simple Snowman

  Hello friends and welcome back to my Fairy Stamper Friday share!


Did you catch the International Stamps sales event that Fairy Stamper store had this last weekend?  I always buy more than my fair share during these sales events.  Although I love my fairies, sometimes, it's awesome to get a few other stamps.  Using the snowman only, from the Winter Chatter stamp set by Frog's Whiskers Ink, I made this quick and easy card.


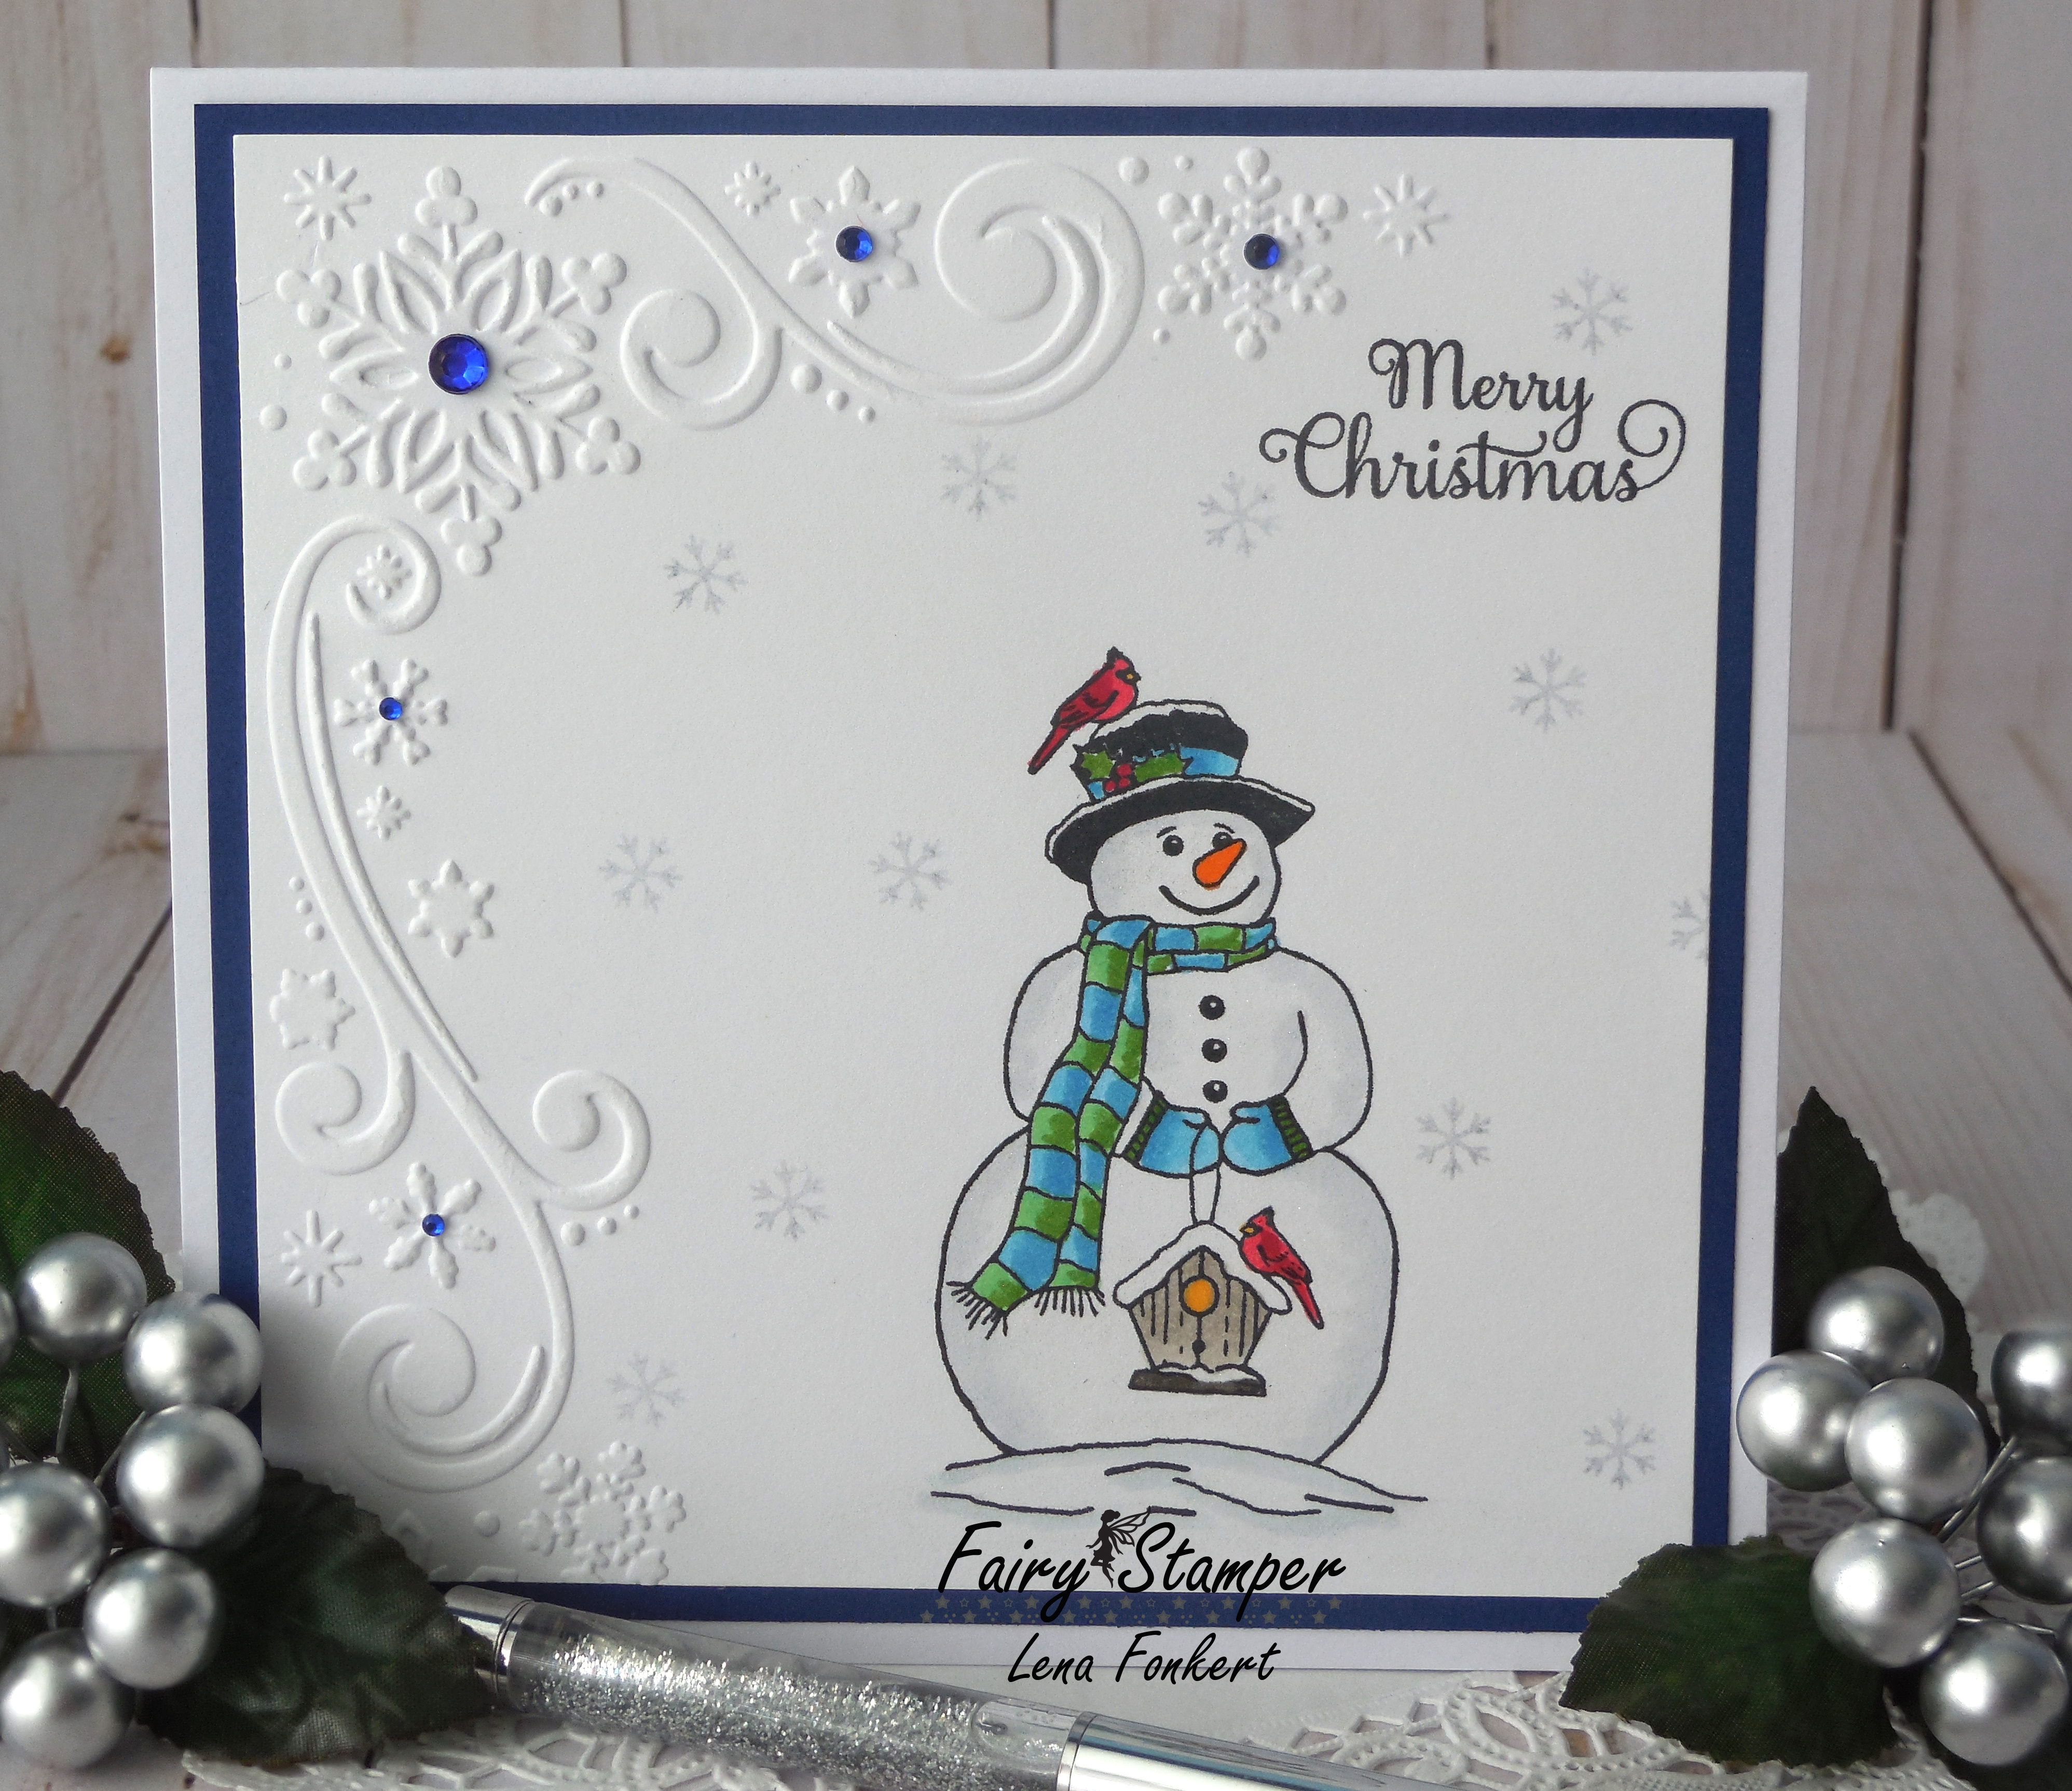
As you can see, just an embossing folder and the snowman stamp was all that was needed.
My intention was to use the Love at Christmas stamp but I cannot find.  I know it's somewhere in the mess that is my hobby room right now.  It has also been converted into Santa's wrapping station, so everything is everywhere :-)  It would have been the perfect sentiment to put on the inside of this card.  But since I could not find it, I used a small stamp for the Merry Christmas on the front of the card. My snowflakes were also stamped with a little stamp I got in my stash.  I have since then, received my order from the Fairy Stamper store, and the Snowfall stamp would have worked beautifully.

So here is a list of the supplies I used and those I wanted to use :-)


Thanks so much for stopping by today.  I hope you will come play along with us and share your magical creations on our Facebook group.

Till next time,
crafty hugs!

14 October 2022

Fairy Stamper ~ Sunset in Fairy Land

Hello friends and welcome back to my Fairy Stamper Friday share!


It's that time of the day when fairies return home for the night.


This was actually a very simple card to put together. I began by inking the background in sunset colours. Then I stamped and coloured Ania's Tree.  Next I stamped the Fairy Nests and a few of the Condo Dweller fairies.  I inked the ground and using a fine pen, added a few more grassy sprigs here and there.


On the inside, I stamped a couple of the Condo Dwellers for continuity, and the birthday sentiment.

Here is a list of the supplies I used, each linked each to the Fairy Stamper store, for your convenience.

Broken China, Dusty Concord, Spun Sugar, Mustard Seed
Raven Black

Thank you so much for stopping by today.  I hope I have inspired you to create a project and to come join the fun. Our challenges go live every other Thursday on our Facebook group.   All you have to do is to create a project and upload the pic to our challenge album.  There is a $15.00 prize for one lucky participant.

Till next time,
crafty hugs!

19 August 2022

Fairy Stamper - Tea Time

Hello friends and welcome back to my Fairy Stamper Friday share!


My little granddaughter was invited to a tea party to celebrate a friend's birthday.  While talking to her about it, I showed her one of the tea sets I have, and although I don't have any that look like this, it was the inspiration for this card 😀


This card was very easy to put together and it's pretty much self explanatory. If you're one of my followers you know how I enjoy mixing stamps and dies to get the look I'm after, so this card was fun to make. 

Here is the list of supplies I used to make this card, all linked to the Fairy Stamper store, for your convenience.

Fairy Hugs Papers - Lavender Dilly
Fairy Hugs Stamps - Gingko Branch, Like a Teacup
Fairy Hugs Ink - Black Raven
Memento Ink - Northern Pine

Thanks so much for stopping by today.  I hope you will come play along with us and share your magical projects on our Facebook group.

Till next time,
crafty hugs!


08 April 2022

Fairy Stamper ~ Easter Greetings

 Hello friends and welcome to my Fairy Stamper Friday share!


Easter is next weekend and I'm still a few cards short.  Fortunately, those that needed to be mailed overseas are already on their way, so now to focus on the ones for local family members.


I began by making a mask of an Easter egg and placed it more or less in the center of the smooth cardstock panel. This egg came out a little wonky, but that is what's special about being handmade, right?  That's my story, and I'm sticking to it! 😀

Next I stamped the bunnies, then the grass and then inked the sky.  I wasn't too happy with the way the grass came out so drew in a few tufts here and there to complete the scene. And now for confession time.  If you're a crafter, I'm sure you'll understand ... hubby came in asking me for a sharpie.  Wanting to see that it was one of the ones that worked, (yes, I need to go thru and throw out the ones that don't) I took the cap off and dropped the dang thing right on my card.  Not having time to start over, I decided to hide the black smudge with some die cut Easter eggs.  Since I often use stamps and dies on my projects, I think it worked out okay.
I really struggle with CAS cards, all that white just gets to me and begs to be filled in with something 😀 So I stamped the greeting at the top and added a few more Easter eggs, as well as a lil carrot, at the bottom.  To complete my scene,  I added the lil butterflies.  See, I told you, I just can't leave well enough alone! 😀


I did on the inside though - just stamped the sentiment and the grass and then added a few die cuts of Easter eggs and another carrot.   Of course, the only reason there is so much white is because I need space to write my message 😀

Now for the list of supplies I used, each linked to the Fairy Stamper store, for your convenience.

Fairy Hugs stamps - Sivelle (for the butterflies)
Nellie's Choice stamps - Spring Hares, Spring Meadow
Fairy Hugs ink - Raven Black
Distress Oxide inks - Tumbled GlassBroken China
VersaFine Clair inks - Shady Lane, Rain Forest, Blue Bell

Thanks so much for stopping by today.  I hope you will come play along with us. Our challenges go live on the first Thursday of each month on our Facebook group.   All you have to do is to create a project using your stamps, and upload the pic to our challenge album.  There is a prize drawn for one lucky crafter, at the end of every challenge. 😀

Till next time,
crafty hugs!
 

17 December 2021

Fairy Stamper ~ Santa Claus is coming to town ...

  Happy Friday crafting friends and welcome to my Fairy Stamper Friday Share.


There is a week left till Santa comes to town. Did you make the "Nice" list this year? Will he bring you lots of crafting goodness? I hope so and that you get everything on your wish list!
For my card today,  Santa is flying over the roof tops. I made a slimline card, using a premade background, to accommodate the height of the scene.  Lots of inking, stamping and fun in making this card :-)


I love this Christmas sentiment and since it is rather large, it fits beautifully on a slimline card.  I wasn't too happy that the sentiment alone made the inside look very blah, so I added a few snowy trees. This still leaves me plenty of space to write my personal message, but adds that something extra 😀

Now for the supplies used to make this card, most linked to the Fairy Stamper store, for your convenience.

Fairy Stamper Stamps ~ Roof Tops
Studio Light Stamps ~ Winter Charm
Frog's Whiskers Ink. Stamps ~ Snow Trio Trees, My Christmas
Designer Boutique Stamps ~ Above the Roof Tops
Fairy Hugs Papers ~ Moon Light Night
Fairy Hugs Inks ~ Raven Black
Hero Arts Inks ~ Unicorn
VersaFine Clair Inks ~ Morning Mist, Rainforest
Distress Oxide Inks ~ Mustard Seed

You'll notice that there are a few stamps that do not have links to the Fairy Stamper store.  This is because they were purchased during one of Fairy Stamper's International sales events.  These sales take place every so often and the best way to know about them is to subscribe to the Fairy Stamper store newsletter HERE.  (Scroll down to the very bottom of the page and enter your information)

Thank you so much for stopping by today.  I hope I have inspired you to create a project and to come join the fun. Our challenges go live on the first Thursday of each month on our Facebook group.   All you have to do is to create a project and upload the pic to our challenge album.  There is a $15.00 prize for one lucky crafter 😀

Till next time,
crafty hugs!

10 December 2021

Fairy Stamper ~ Kitty Mischief

   Happy Friday crafting friends and welcome to my Fairy Stamper Friday Share.


Inspired by the many videos popping up everywhere about kitties and Christmas trees, I made this card.  Even in Fairy Land, shiny ornaments are just too much temptation for a mere kitty :-)


I began by creating the background using a stencil from Elizabeth Craft Designs. Next I stamped the tree, the fairy atop the tree, and the ornaments. I added a little bit of shine and dimension by using Glaze pens to go over the ornaments and the string of berries. Once that was all dry, I stamped Ed. I love the expression on this little kitty's face :-)


On the inside I stamped the greeting but felt that it all looked a little too plain, so I added a few branches and a few berries.
And that was it.  Simple and quick, and hopefully with an element of Christmas fun.

Here is the list of supplies I used, each linked to the Fairy Stamper store for your convenience.

Fairy Hugs Glitter - Currant
Fairy Hugs Ink - Raven Black
Distress Oxide Inks - Stormy Sky, Dusty Concord, Faded Jeans
VersaFine Clair Inks - Rain Forest, Blue Belle, Glamorous 

Thank you so much for stopping by today.  I hope I have inspired you to create a project and to come join the fun. Our challenges go live on the first Thursday of each month on our Facebook group.   All you have to do is to create a project and upload the pic to our challenge album.  There is a $15.00 prize for one lucky crafter 😀

Till next time,
crafty hugs!

12 November 2021

Fairy Stamper ~ Hoots!

  Happy Friday crafting friends and welcome to my Fairy Stamper Friday Share.


Isn't the new release just gorgeous? It reminded me of how much I used to love to read ... until I discovered card making 😀


I began by using a sheet of the Purple Fairy papers and adhering it to my card base.
Next I stamped the Open Book and Hoots on a piece of scrap card stock and did a little bit of colouring. You can't see it from the pic but Hoots is styling a glittery pair of glasses.  Then I fussy cut both images and popped them onto the card using foam dots, one for the book and a double layer for Hoots.
 

On the inside, I used another piece of the Purple Fairy papers and stamped the Between Pages sentiment.  I also added the Stacked Books and did a tiny bit of colouring to enhance them. Looking back I'm not sure that white was the best colour although it was the colour that made them stand out the most.  But next time, I will definitely try different colours for the books.

I have linked all the Fairy Hugs stamps, above, to the Fairy Stamper store for your convenience.  In addition to the stamps I used the following products:


Thank you so much for stopping by today.  I hope I have inspired you to create a project and to come join the fun. Our challenges go live every other Thursday on our Facebook group.   All you have to do is to create a project and upload the pic to our challenge album.  There is a $15.00 prize for one lucky crafter 😀

Till next time,
crafty hugs!

29 October 2021

Fairy Stamper ~ When Witches Go Riding ...

... and black cats are seen,
the moon laughs and whispers
'Tis Near Halloween!

Welcome friends, to my Fairy Stamper Friday Share.


At this time of the year, all the witches meet at the Gnome Mansion for their Halloween Party.
Unfortunately they take over the entire Mansion, and this makes the gnomes a bit grumpy because they can't stand all the cackling! On the positive side though, it's good for business 😁


I began with a piece of orange cardstock and then using Distress Oxide inks, I inked the background. In order to make the moon stand out a little brighter, I rubbed a little Picket Fence ink with my finger. Next I stamped the Gnome Mansion, the gnomes and all the Witchy Dwellers.  On the inside, I stamped the greeting as well as a few spiders and spiderwebs.  And that was that, my last Halloween card for 2021!

Now for the list of supplies I used, all available at the Fairy Stamper Store.

Fairy Hugs Stamps
Fairy Hugs Ink 
Distress Oxide Inks

If you're wondering about my Spider Juice, then let me assure you that it is not "juice made by spiders", as my little 4 year old grandson thought 😀  When we moved from South Africa, we brought a few bottles of liqueur with us.  One of them was Black Sambuca.  After a couple of years, the bottle was still half full and we didn't think it was good for drinking anymore.  At about the same time, I had bought a set of 3 "potions" bottles at Michaels and the Black Sambuca was just the perfect liquid to pour into each one.  I sealed each bottle with wax and voila, 3 potions bottles, that decorate my coffee table in the living during Halloween, you know just in case someone wants to come in for 'spell' 😀 👻


Thank you so much for stopping by today.  I hope I have inspired you to create a project and to come join the fun. Our challenges go live every other Thursday on our Facebook group.   All you have to do is to create a project and upload the pic to our challenge album.  There is a $15.00 prize for one lucky participant.

~~ HAPPY HALLOWEEN ~~

Crafty hugs,


10 September 2021

Wishing you fairies ...

   Hello crafting friends!  Welcome to my Fairy Stamper Friday share.


When I first saw these fairies, I thought that they looked very dainty sitting on their magical flowers.  Then while looking through my papers, I found this paper pad from The Paper Boutique called Lavender Fields, and with its dainty floral pattern, I thought it would be a perfect match 😀

I used slimline dies, from Marianne Designs and Tutti Designs, to cut and create the card base and the different mats for the fairies. You can find a selection of slimline dies at the Fairy Stamper store HERE.

On the inside, I continued with my fairy magic and the lavender and green colour scheme.  I haven't added a sentiment to the inside because I'll probably just write my own personal message. I love the greeting on the front of the card.  I think it's a wonderful wish for several different occasions, but especially for birthdays!

As you can see it was pretty simple to put together. As I mentioned before, although I love silhouette stamps, I don't always have the time to create a pretty background with all the lovely inks, sprays, etc. that are available.  At times like these, my dies tend to come to the rescue. 😀

I have listed the materials I used to create this card, and I have linked each to the Fairy Stamper store.
Fairy Hugs Glitter - Translucent Pearl
Fairy Hugs Ink - Raven Black

Thank you so much for stopping by today.  I hope I have inspired you to create a project so that you can  come join in the fun. Our challenges go live every other Thursday on our Facebook group.   All you have to do is to create a project and upload the pic to our challenge album.  There is a $15.00 prize for one lucky participant.

Till next time,
crafty hugs!

03 September 2021

Fairy Stamper ~ Skunk Mischief :-)

  Hello everyone!  Welcome to my Fairy Stamper Friday share.


I used a bunch of Fairy Hugs stamps to create this fun scene, where Jada is telling the little rascal that just because last night's storm blew a few ornaments off the tree, it does not make them toys! The little skunk, on the other hand, is trying to tell Jada that he is not playing with them, he is in fact collecting them so she can hang them back on the tree. Jada is not totally convinced due to the fact that she caught him running around with an ornament in his mouth 😀


I began by inking in the snowy banks and then the sky.  Next I stamped the pine branches, the tree trunk, Jada and the little skunks. The whole scene look very bare to me, remember I don't do CAS well, so I grabbed some small ferns and berries and scattered them around.  After all, this is Fairy Land and all sorts of wonderful and tasty sprigs and berries grow in the snow. 😀  I also added a few pinecones to the branches before stamping the ornaments. 

After colouring in Jada, I felt that the ornaments were a little blah, so I grabbed my metallic markers and coloured over them.  These markers not only add a metallic effect, but they also add a little texture.  You can see this on the pic below.


To go with my shiny ornaments, I decided to use gold mirror cardstock as a mat on the front of the card as well as on the inside.  I also used a gold foiled Christmas greeting sticker and hung an ornament on it, just for good measure :-) 

On the inside of the card, I stamped another few branches, pinecones, and ornaments, leaving lots of room to write my personal message.

Now for the list of crafty supplies I used, each linked to the Fairy Stamper store, for your convenience.

Fairy Hugs Stamps -  Logs, Jada, Decorating the Tree, Skunks Set,
Nellie's Choice Stamps- Berries
Fairy Hugs Inks - Raven Black
VersaFine Clair Inks - Pinecone, Forest Green
Distress Oxide Inks - Tumbled Glass, Faded Jeans, Stormy Sky

Thank you so much for stopping by today.  I hope I have inspired you to create a project and to come join the fun. Our challenges go live every other Thursday on our Facebook group.   All you have to do is to create a project and upload the pic to our challenge album.  There is a $15.00 prize for one lucky participant.

Till next time,
crafty hugs!


16 July 2021

Fairy Stamper ~ Spinner and Friend

   Hello crafting friends, and welcome to my Fairy Stamper Friday share.


I have a fun summer card to share with you today.
This is Spinner and his friend frolicking at sunset.


To make the background, I cut a stencil using a file from the Silhouette store and I used distress inks to enhance the colours of the background. Next, I stamped Spinner in Fairy Hugs Raven Black ink and then in Memento's London Fog grey ink, masking as I went along. I cut out the same design in green and snipped the green leaves to add a little bit more colour. To create the look of  foam on the splashes I used a little Glitz Glitter gel.  On the inside, I cut out the same design and stamped the greeting.

Thank you so much for stopping by today.  I hope I have inspired you to create a project and come join the fun. Our challenges go live every other Thursday on our Facebook group.   All you have to do is to create a project and upload the pic to our challenge album.  There is a $15.00 prize for one lucky participant.

Till next time,
crafty hugs!