Showing posts with label Hobby Dots. Show all posts

30 June 2025

Christmas Crafts All Year 'Round ~ Blue Christmas

  Hello and welcome to this month's Christmas challenge at
 Christmas Crafts All Year 'Round.


Our inspiration song for July's challenge is 𝅘𝅥𝅮𝅘𝅥𝅯 Blue Christmas 𝅘𝅥𝅮𝅘𝅥𝅯.  This means that you can use any verse, phrase or word in the song to create your Christmas project.  Here are the lyrics of this song for your inspiration

~ Blue Christmas ~
 I'll have a blue Christmas without you
I'll be so blue just thinking about you
Decorations of red on a green Christmas tree
Won't be the same dear, if you're not here with me
And when those blue snowflakes start falling
That's when those blue memories start calling
You'll be doing all right
With your Christmas of white
But I'll have a blue, blue, blue, blue Christmas
You'll be doing alright
With your Christmas of white
But I'll have a blue, blue, blue, blue Christmas
You'll be doing all right
With your Christmas of white
But I'll have a blue, blue, blue, blue Christmas

I've been playing with some of my Dot & Do card kits.  This one is from the Snowmen kit.  I thought all the blues would be perfect for our challenge.


It takes a bit of time to get all the beautiful hobby dots in place, but I find it very relaxing.  The image consists of 4 layers which were fussy cut and adhered to each other using foam squares.


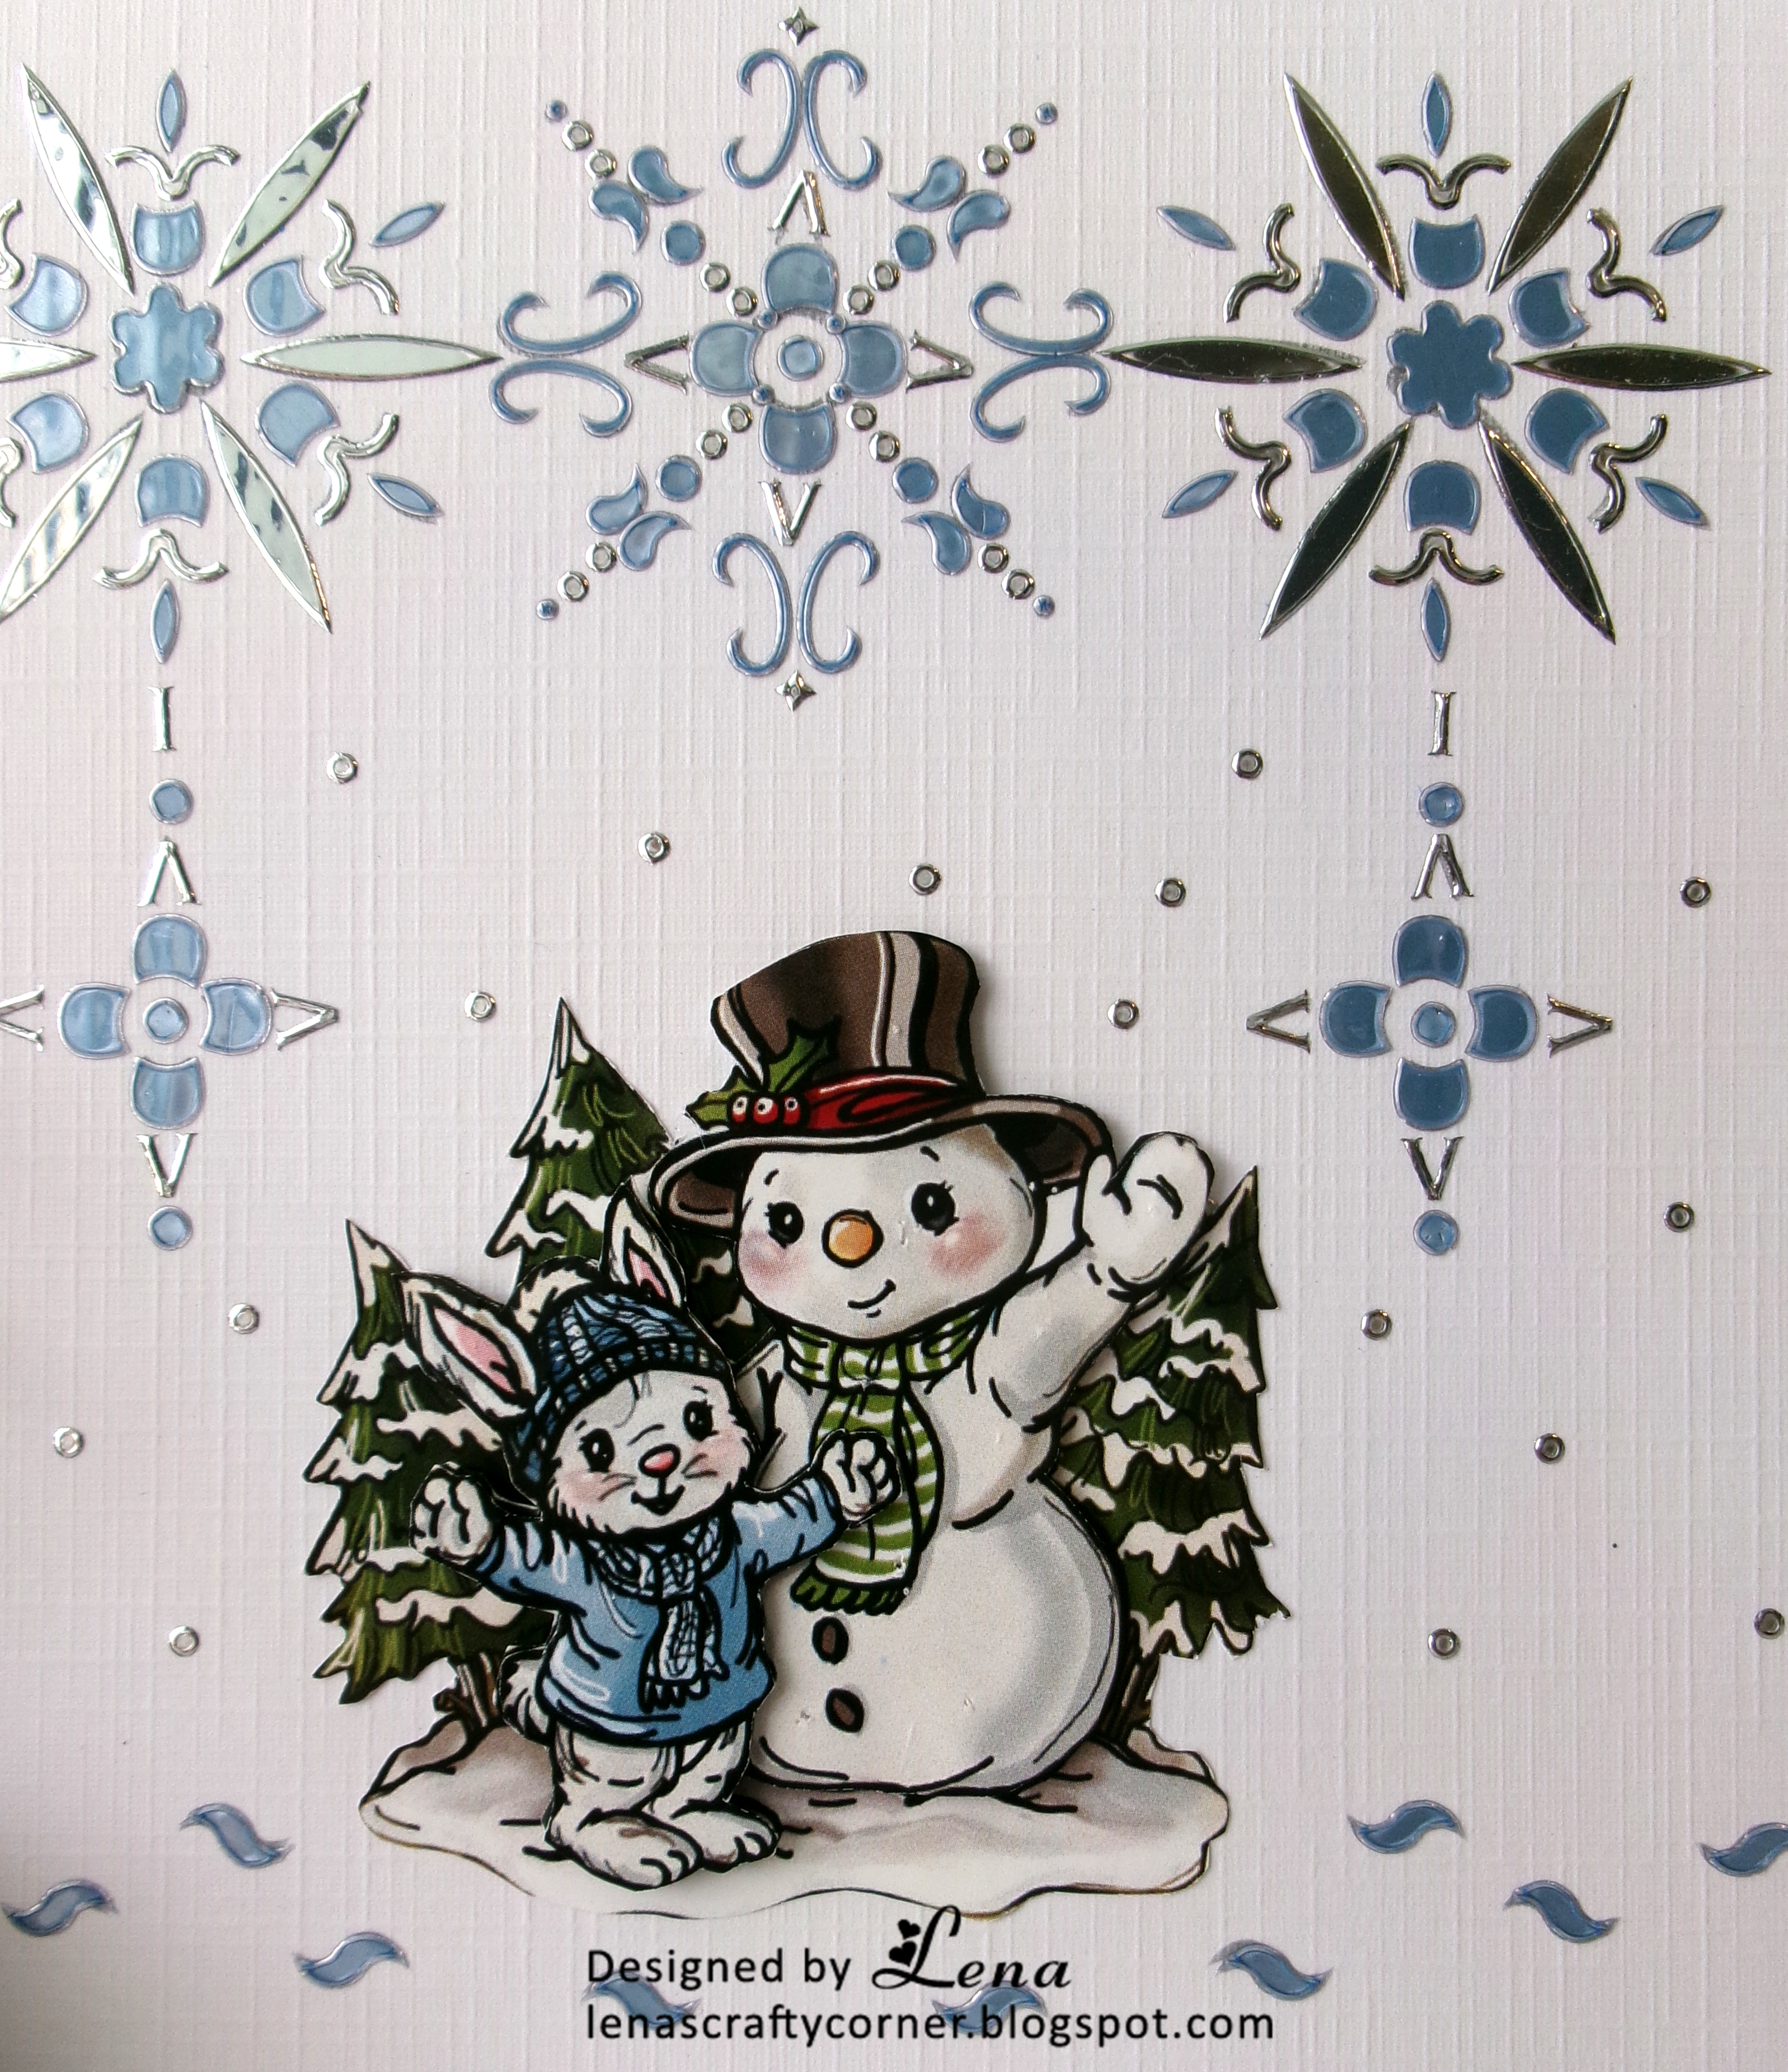
Here is a close up of the hobby dots and the very cute image.


I used the Merry Christmas w/Shadow dies, from Karen Burniston, to create the greeting on the inside of this card.

Thanks so much for stopping by.  Now it's your turn to make a Christmas project,  and come play along with us.  You have till the end of the month to link your project to our blog at  Christmas Crafts All Year 'Round.

Crafty hugs,


08 October 2021

Stitched Christmas Card No. 3

Happy Friday crafting friends. I hope it's the start to an awesome weekend.
 I have another finished card to share with you today :-)


I hope you like.  I'll be back soon with stitched card no. 4

Till then,
stay safe and well.

Hugs,


31 December 2019

January Challenge at CCAYR ~ Anything Goes

 Happy New Year, crafting friends, and welcome to January's challenge at
 Christmas Crafts All Year 'Round

Our challenge this month is Anything Goes!

As you may know, from following my blog, I have family visiting from overseas during this holiday season.  My sister-in-law brought a few card kits with her, from Holland, and we've been having fun crafting together.

Here is the card I made for this challenge from one of the card kits.


Isn't it pretty and festive?


You can't quite tell from the photo, but the hobby dots design is made on acetate which is then adhered to the red card stock underneath.  It's such a pretty effect, one that I unfortunately was not able to capture on the photo.  This photo, does however, show a bit of the beautiful shinning details.
The Border Round Magic Stars die is from a company called Craft Emotions. 
The poinsettia flower is a 3D sticker from Paper Crafts sold by Hobby Lobby.


For the inside, I used the negative die cut of the stars die.
The sentiment is from a stamp set called Festive Greetings by Creative Expressions.

Thanks so much for stopping by today. I hope you  make a Christmas project and come play along with us.  You have till the end of January 2020 to link your project to our blog at Christmas Crafts All Year 'Round!


31 May 2019

June's Challenge at CCAYR

Hello and welcome to June's challenge at
 hosted by the Gingerbread Gals.


June Challenge ~ Garland / Flowers / Leaves
Prize ~  please visit the CCAYR blog

For this month's challenge I pulled out some of my hobby dots and played a little :-)  I hadn't used them in a while and it reminded me of how relaxing and fun it can be :-)
 

After completing the pattern with the beautiful silver mirror hobby dots, I used a decoupage image that came in the same kit. By putting foam dots in between each of  the three layers, I was able to create a beautiful dimension to the flower and the leaves.


This photo was taken from a different angle.  Here you can clearly see the mirror card stock effect.


On the inside I made a little corner to match and to bring it altogether. The stamped sentiment is a rubber stamp from Great Impressions Stamps.

That was it.  It was fun, relaxing and didn't take too much time. I need to play with hobby dots more often :-)

Now it's your turn to join in the fun.
You have till the end of the month to link your project to our challenge.
Looking forward to seeing your festive creations.

Till next time, happy crafting!


11 January 2019

Christmas Cards - Part 2

Happy Friday bloggie friends, I hope it's the start to an awesome weekend.
As promised here are the other 3 cards that I have complete from this kit.  If you missed Part 1, go HERE to take a peek.


Thanks for stopping by.
Till next time,
Crafty hugs.


10 January 2019

Christmas Cards - Part 1

Hi everyone. Now that ALL Christmas cards have been received, (some must have taken a scenic route to get to their destination 😃) I can finally share with you some of the cards I made from a Christmas Book Card kit called Specialties No. 3 from Find It Trading, Netherlands.


I thought I would share the first 3 with you today so as not to make this post too long.


 It was so much fun working on these cards.  I've completed 6 so far and plan to finish the others soon.  I got another one of these books for Christmas you see, so I want to get started on that one too :-)  It comes with 12 cards and uses a combination of stitching, hobby dots and a decoupage image as the focal point.

Thank you for visiting and spending a few minutes of your day with me.
I'll be back tomorrow with the other 3 cards from this kit. As for the remaining 6, I will share as I complete each one and add them my Christmas card stash for Christmas 2019 :-)

Crafty hugs,


13 February 2018

Happy Birthday with Hobby Dots

Hello crafting friends. Welcome to this week's challenge at PDE!


Challenge #7 ~ Anything Goes

I used Hobby Dots to create the background of my card and a sweet image from a 3D decoupage sheet.  Since this is going to Holland, I thought this little cow was perfect for this card.


These cards always come out so pretty :-) and they're so easy and relaxing to make.
Everything you need for the card comes in the kit. There is no time spent on figuring out card design, what papers to use, etc. It's all there for you! :-)


I continued the theme on the inside of the card. This I did on my own, as the kits do not provide for the inside of the cards.  I left mine blank because I want to write my own birthday message.


I know that this is an awful photo, but it's the best I could do to show you how beautiful these hobby dots really are. They have a beautiful shine to them! You can also see the layers of the cow ... well maybe, if you close one eye and squint with the other :-) Joking aside, if you click on any of the images, it will pull up a larger photo and you can see it better.

Well, that is all from me for today.   I hope you've enjoyed your visit and will come play along with us.  Please take a few minutes and visit our blog to see what my DT teamies came up with, for your inspiration.  You have till noon, EST on 20 February, 2018 to link your project.

Hugs,

10 May 2017

Make it Bling! at Crafty Gals Corner

Hello crafting friends. Hope you're all doing well!
Time for a new challenge at Crafty Gals Corner!


Challenge #122 ~ Make it Bling!

Our sponsor this week is:

The Paper Shelter
Prize ~ $15 Gift Certificate

I used a pre-coloured image called Penguin Friends from The Paper Shelter.
As soon as I saw this cutie, I knew I wanted to use her as the focal point of my card.  So I grabbed my hobby dots card kit, my light box and spent a couple of very relaxing hours putting it all together.


I was so lucky that I had hobby dots in just the right shades of blue and green to match my pre-coloured image.


As you can see on the above pic, all the hobby dots are really shiny. I added some poinsettias in blue to adorn the corners of the card and to mat the image. This is Powder Blue card stock from GinaK.


Here is a close up giving you a better look at the bling. I added 3 little silver metal gems to the centre of each flower, which was cut with the Holly Frame die from Spellbinders.  The little green sprigs were punched out using a MS punch.


On the inside of the card, I added another two little poinsettias and a stamped greeting from Great Impression Stamps.

Thank you so much for stopping by today.   Now it's your turn to make a project, add bling,   and come  play along with us this week.   You have till noon, CST, on Tuesday, 16 May 2017, to link your project to the Crafty Gals Corner blog.

Till next time, happy crafting!
Hugs,

12 March 2015

Cardz TV Challenge #5 ~ Spring!

TGIF! :-) I hope it's the start to a great weekend, bloggie friends. 


Welcome back to my blog and to challenge #5 at Cardz TV.  This week's challenge is to make a card for Spring.  The prize is a set of Cardz TV stamps, generously sponsored by Mary :-)


So here is what I came up with.  Can you see a little Dutch influence on this card? :-)
I have pics towards the bottom of this post showing you more on Hobby Dots.

I used the following supplies:
Cardstocks ~ Recollections
Card size ~ 5.25" x 5.25"
Delft Blue Corners ~ Hobby Dots - Set 011-01
Watering Can w/Tulips ~ Cottage Cutz Dies
Inside of the Card ~ Left over hobbydots - design created by me :-)


As you can see, this is a wonderful set to have.  It is one of my "go-to" sets as there is a greeting for every occasion :-)  To view/purchase this stamp set or any of the other wonderful sets you can click here.
While there, you can see the new release of the most adorable greetings and sentiments :-)

You have till noon EST on Thursday, 26 March 2015, to complete your Spring project and to link it to our challenge.  Can't wait to see all your wonderful creations :-)

There have been a few of you lovely followers that have asked me about Hobby Dots.  Well here are a few pics showing you what it's all about ...


This is how they come in a packet. You have the two or three sheets with the Hobby Dots and normally a decoupage sheet which has the template attached.


This is the template I used for the corners.  I did not use the decoupage image because I wanted to use the watering can with the tulips.  And that is the great thing about these Hobby Dots. They come with an entire kit to make a card, but you can change it anyway you want.  If you are creative enough, and want to take the time, you can even come up with your own pattern :-)  


And this is how I place the Hobby Dots on the card. You have to use a light box, then place some double sided tape and adhere your template.  You can then place your card over the template and position the Hobby Dots by following the pattern.  It's easy to do, just very time consuming.  But I think, in the end, it's worth it because it looks so pretty :-)

I hope that you enjoyed my card.
 Thank you for stopping by today and for all the encouraging comments that you take the time to leave on my blog :-)

Wishing you and yours a wonderful weekend.