Showing posts with label Birthdays. Show all posts

20 June 2025

A Money Tree Birthday

 Welcome back crafting friends.  Here is a Money Tree card I made for my son's girlfriend's birthday.  She loves gnomes and let's face it, who wouldn't want a little money tree in the backyard? 💰🤑


This card was made using the Stitch & Do kit number 220.  The gold accents are from a Birthday Sticker Sheet.


I love this little gnome tending his money tree.  I really wish I had one of them too!


I googled, print and cut, using the Silhouette, a few $100 bills.  I cut 15 bills and made 3 piles to have the necessary dimension to hold the easel part of the card.  When closed, this card measures 5.25" x 5.25".

That's all for today folks.  I hope I'll see you again next time.

Hugs,


17 June 2025

It's a WOW Birthday!

 Hello friends.  Every time I make one of these cards, I always think that it will be last one because, as you can imagine, it's a lot of work and very time consuming.  But when the right birthday comes along, I forget about all that and have a lot of fun picturing the recipient's face when she/he opens their birthday card.  Such was it with this card ...


I used a file from Silhouette to make all required amount of sections to include the 75 candles.  I used another Silhouette file to make the daisies to decorate it.  The Happy Birthday greeting and the numbers are included in the card base file.  The ladybugs are little self adhesive 3D stickers from Hobby Lobby.

I think my friend liked it very much so it was worth the work and time I put into it :-)

So glad you came for a visit today.  I hope to see you again soon.

Hugs,


07 June 2025

Catching up and a Fairy Card

 Hello crafting friends.  It's been a few months since I've posted anything other then my DT cards.  It's been a few months of trying to heal from different illnesses starting with a small fall which led to almost 4 weeks of pain in my ribs.  Somehow I managed to crunch my floating ribs on impact.  Just a small fall off a curb and onto my knees.  In fact there was nothing on my knees to show for it.  That set off a series of illnesses and to be short and sweet I'm just sick of being sick!  Hopefully I'm finally on the way to full recovery and getting ready to enjoy my Summer and Summer holidays.

Through all of the above, I've still been able to make cards for my family for various events from Valentine Day's cards, which I have not shared, to today when my little Emma had her 11th birthday party.  So when you see Valentine cards, Easter cards, etc. on my posts, at least you'll know that I haven't lost my marbles (not yet anyway 😀), I'm just catching up on posts.

I'll start with the card I made for my little Emma who loves fairies.  Since I wasn't feeling that great, I started going through my pile of card kits. It's so much easier when everything is all together and already sorted out for you 😀 This card is made from supplies from Hunkydory's toppers and backgrounds called a Touch of Magic.


Fairy "floating" on acetate.


A close up of the Fairy and papers


A close up of the background.


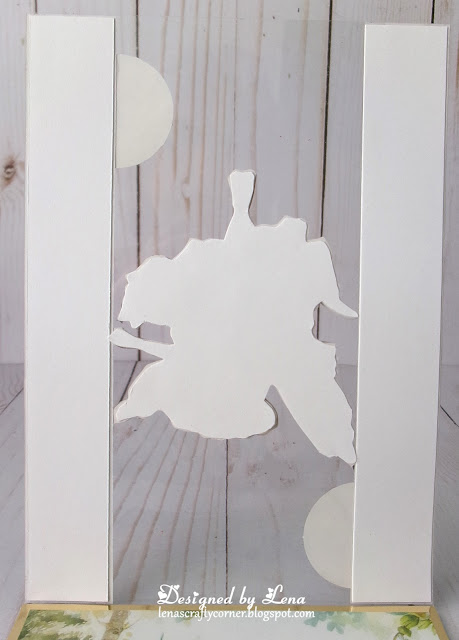
My OCD would not allow the glue dots to be seen, so I cut out a shadow piece of the fairy out of white cardstock and adhered it to the inside. I also added a plain white piece of cardstock to cover the sides. This way, it all looks nice and neat and my OCD is at peace 😀


I added my greeting and a couple of lil roses to the back of the card.  This is where I wrote my message.


When the card is closed and ready to place in envelope, it measures 7" x 5".
My little Emma loved it, so mission accomplished!

Materials used:
Hunkydory - A Touch of Magic Decoupage Toppers
Hunkydory - A Touch of Magic Brilliant Backgrounds
Kat Scrappiness - Happy Birthday w/Shadow Die

Thank you so much for stopping by today.  I will have a few more "catching up" posts in the next few days.  I hope you'll come back and visit again.

Crafty hugs,


20 November 2024

The Paper Shelter #619 ~ Add a Number

    Hello crafting friends and welcome to this week's challenge


Team A - our challenge this week is 
~ Add a Number ~ 

I used The Number One Hot Dog digi set from The Paper Shelter to create my card.


I uploaded this cutie to Silhouette and used the print and cut feature to cut it out twice.  Remember I always print my digi images on photo paper to get a crisp vivid image.  Not that cardstock doesn't print well, I just prefer the vivid colours on my printer when printing on photo paper. 


I adhered the two layers together using foam squares.  By now you guys know that I always do this to give my cards a little dimension.  I normally use the 1 mm foam squares from Hunkydory or from Marianne Designs.  This adds dimension but very little bulk which is important for me as I mail a lot of my cards overseas. 


Since she is selling hot dogs, I thought I would add a few of my other favourite "fun" foods, burgers and fries! Don't know why people call them junk!  I think they're awesome!!!!😁  I especially love the fries (chips) you buy in Holland.  They come in cones with a large dollop of mayonnaise and a tiny fork, just as pictured above.

I used the following materials to create this card:
Card Frame - SL35 - Studio Light
Cactus Hillside Border - Lawn Fawn
Fries Die Set - Marianne Design
Hamburger Die Set - Marianne Design
Red Cardstock - Bazzill
White Cardstock - Colorbok
Pattern Paper - DCWV
Silhouette - Greeting and Sentiment
Stampin' Up Punches for mats of Sentiment
Twine - The Paper Studio


For the birthday greeting, I made it in Silhouette and then printed it on photo paper too.  I just didn't have a Happy Birthday die that would fit on this small card front.  Lastly I threaded a piece of white and silver twine through the side of the card. When closed and ready to mail, this card measures 6" x 4" and fits perfectly into an A7 envelope.

Thanks so much for stopping by today.  Before I leave, I would like to invite you to come play along with us.  Remember that The Paper Shelter has fabulous prizes up for grabs. Check out the details below ...


I do hope you will come join the fun and share your projects with us.
You'll find our challenge blog HERE.

Crafty hugs,


14 August 2024

Crafty Gals Corner #258 ~ Anything Goes w/Twist - Use an Embossing Folder

  Hello crafting friends and welcome to our August's challenge


Challenge #258 ~ Anything Goes with optional twist - Use an Embossing Folder!

Our sponsors for this challenge are: 
(listed in alphabetical order) 

Prize ~ 3 Digital Images

* * * * * * * * * *
Prize: 3 Digital Stamps

* * * * * * * * * *
My son's girlfriend loves gnomes, so when I saw this Gnome with a Daisy from The Paper Shelter, I thought it the perfect digi to make a birthday card for her.


I made this diamond easel card using Bazzill cardstock for the base.  The patterned paper is from a 6" x 6" Memory Box paper pad called Magnolia Grove.


I decided to include our optional twist of using an embossing folder, and used the Dotty Flourish 3D embossing folder from Creative Expressions, to create the backgroud for the happy gnome.


On the inside, I used three daisies to create the stopper for the card.


I made this card to be 5.5" by 5.5".  It fits perfectly into a 5.75" square envelope.
Since I am going to hand deliver it, it won't be a problem for me, but I'm pretty sure that the bow will flatten when put in the mail.  In order to avoid from it becoming completely flat, you can insert a couple of foam squares into each loop.  I've tried this before and it fared well in the mail.

Thank you so much for stopping by today.  I would love to you see you play along with us.  You have until noon, CST, on 10 September 2024, to link your project to our challenge.

Crafty hugs,


19 June 2024

The Paper Shelter #601 ~ Hunky Dunky Birthday :-)

   Hello crafting friends and welcome to this week's challenge


Team A - our challenge this week is 
~ Summer Activities ~

I made this card, using the Lifeguard on Duty digi, with somone special in mind.  Someone who will appreciate a Hunky Dunky for her birthday 😀


Card base is a file from Silhouette, which I sized to be a 5.5" square card. To make my beach scene, I used several dies, most from Marianne Design.  These are Lifeguard House, Sandy Path, and Beach Houses.  I also used the Tropical Trees Background die set from Sunny Studio.  The stamped greeting is from the Mini Labels stamp set, also by Marianne Design.


Here is a close up of this cutie, which I cut out twice and used foam squares to adhere the two layers together. This adds a little dimension but not too much bulk as this is being mailed overseas.


I added a small palm tree to the inside which left me plenty of space of write my message. All cardstocks were bits and pieces from my scraps drawers.

Thanks so much for stopping by today.  Before I leave, I would like to invite you to come play along with us.  Remember that The Paper Shelter has fabulous prizes up for grabs. Check out the details below ...


I do hope you will come join the fun and share your projects with us.
You'll find our challenge blog HERE.

Crafty hugs,


05 June 2024

The Paper Shelter #599 ~ Sweet Birthday Wishes

  Hello crafting friends and welcome to this week's challenge


Team A - our challenge this week is 
~ Chocolate ~
(Either show chocolates or use shades of brown)

Doesn't this looks delicious?


 I used the Yummy digi from The Paper Shelter for the main part of this card.  For the side steps, I cut out a bunch of chocolate, cookies and bonbons and adhered them to the card.


Here is a close up of this Yummy dessert, which was printed on photo paper.


I used the following dies to create the chocolate, bonbons and cookies, all from Marianne Design:
 Chocolates, Chocolate Bar, and Cookie Jar


On the back, I cut a white mat to write my messge, and adhered some left over chocolate pieces to add a little interest.


I resized this card to be a 6.5" x 5" card, so it fits perfectly into an A7 envelope.  With all the chocolates and cookies I stuffed in it, it has a little bit of bulk to it.  After all there is no such thing as too much chocolate, right?  Anyway, since I'm going to hand deliver it, it's not a problem.  After putting this card together, I was left with the biggest craving for chocolate, so guess what I did after taking all the pics ... yes, you guessed it ... I ate the props 😂😂  

Thanks so much for stopping by today. Before I leave, I would like to invite you to come play along with us.  Remember that The Paper Shelter has fabulous prizes up for grabs. Check out the details below ...


I do hope you will come join the fun and share your projects with us.
You'll find our challenge blog HERE.

Crafty hugs,


17 April 2024

Birthday Card for a Painter

Hi everyone and welcome back. Today I'm sharing the card I made for my son for his birthday.
He has a business 3D printing D&D models and then he paints them by hand. It started as a hobby, but he's so good that he's had several orders (see bottom of post).  Thinking about all the painting he does, I thought this card would be fun for him.


This was the perfect card to use up a bunch of scraps too.  😀
The Painter's Palette is a die from Spellbinders.


On the inside I used the Happy Birthday w/Shadow die, from Kat Scrappiness, to cut out the greeting.  The paint splatters were cut out using a file from Silhouette.


I made this into a 5" x 7" card which fits perfectly into an A7 envelope.
And that was that for my card. My son loved it, so mission accomplished.

  I thought I would include a few pics showing off his painting.  The details are amazing on such tiny little models.  Of course he does larger ones too, but these little ones leave me in awe, especially when he paints entire armies of them. 


These little guys are only 1.5" tall and he managed to paint the pupils in the eyes!


An army in progress ...


This is one of the larger models.  This one is about 5.5" tall.  Isn't the painting amazing?


Look at the detail just on the base.  All painted by hand and then he added the little grass tuffets to make it even more realistic.  I guess he gets his painting skills from hubby, because I can't paint worth diddly!😀

Well folks that is it from me for today.
I'll be back soon to share a few more projects with you.

Crafty hugs,